
Okay, let’s be honest: parties are fun, but the stress of figuring out that one perfect easy taco appetizer that appeals to absolutely everyone? That’s exhausting. You need something that looks impressive but takes zero time away from actually hosting. Trust me on this one—I’ve tested dozens of things in my professional kitchen days, and nothing beats these taco pinwheels for speed and guaranteed applause. They use just a handful of ingredients, but the flavor payoff? Huge. These super simple tortilla roll-ups are the secret weapon any busy host needs. Because they come straight from a foolproof testing process, you know they’ll turn out perfectly cheesy and bright every single time.
- Why You Will Love These Easy Cheesy Taco Pinwheels
- Essential Ingredients for Perfect Taco Pinwheels
- Step-by-Step Instructions for Simple Tortilla Pinwheels
- Tips for Making the Best Make Ahead Appetizers
- Serving Suggestions for Your Mexican Pinwheel Recipe
- Storage and Reheating Instructions for Taco Pinwheels
- Frequently Asked Questions About Taco Pinwheels
- Estimated Nutritional Data for Simple Fiesta Snacks
- Share Your Experience Making These Taco Pinwheels
- Estimated Nutritional Data for Simple Fiesta Snacks
- Share Your Experience Making These Taco Pinwheels
Why You Will Love These Easy Cheesy Taco Pinwheels
Seriously, when you are trying to pull together a spread for game day or a last-minute gathering, you need recipes you can count on. These aren’t those fussy puff pastry things that need twenty steps; these are pure, simple joy. I promised foolproof recipes, and these taco pinwheels deliver!
- Lightning Fast Prep: I’m talking ten minutes, maybe fifteen if you get distracted admiring the cheese. They are the definition of quick and easy party food.
- Maximum Flavor, Zero Cook Time: You don’t even have to turn on the oven! All that creamy, zesty taco filling just gets better as it chills. It’s magic, really.
- Crowd-Pleasing Power: Every time I take a platter of these colorful spirals out, they vanish first. They hit that perfect spot of creamy, salty, and cheesy.
- Make-Ahead Marvel: This is my favorite part. You can easily prep these the night before a party, wrap them tight, and know your morning hosting duties are already halfway done.
- Perfect Finger Food: They slice up beautifully into neat, bite-sized appetizers. No forks needed, just grab-and-go ease.
- Reliably Consistent: Because this recipe relies on pantry staples and a super straightforward method, you never have to worry about them failing when you need them most.
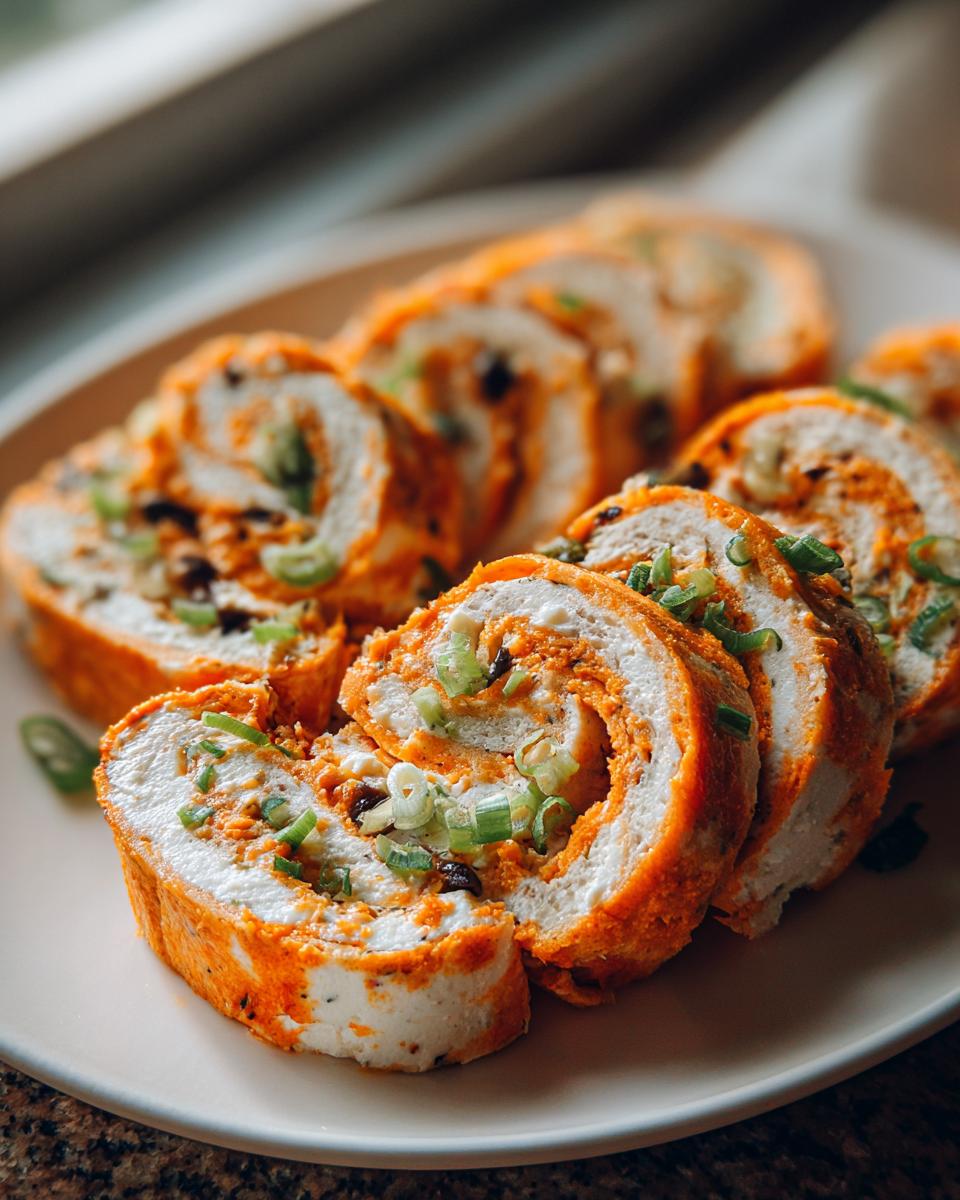
Essential Ingredients for Perfect Taco Pinwheels
The beauty of these cheesy tortilla roll ups is that they rely on ingredients you probably already have sitting in your fridge or pantry. I’m not one for chasing down specialty items for a quick snack! But, like with any good recipe, the quality of a few key players makes a huge difference in the final flavor. When I developed this recipe in the test kitchen, we kept things incredibly simple so that anyone could whip these up fast.
Here is what you need to gather up. Remember, quantities matter, so have everything measured out before you start mixing!
- Ten large flour tortillas (the soft, pliable kind!)
- Eight ounces of cream cheese, softened—this is non-negotiable!
- One standard 1-ounce packet of taco seasoning mix
- One cup of shredded Mexican-blend cheese
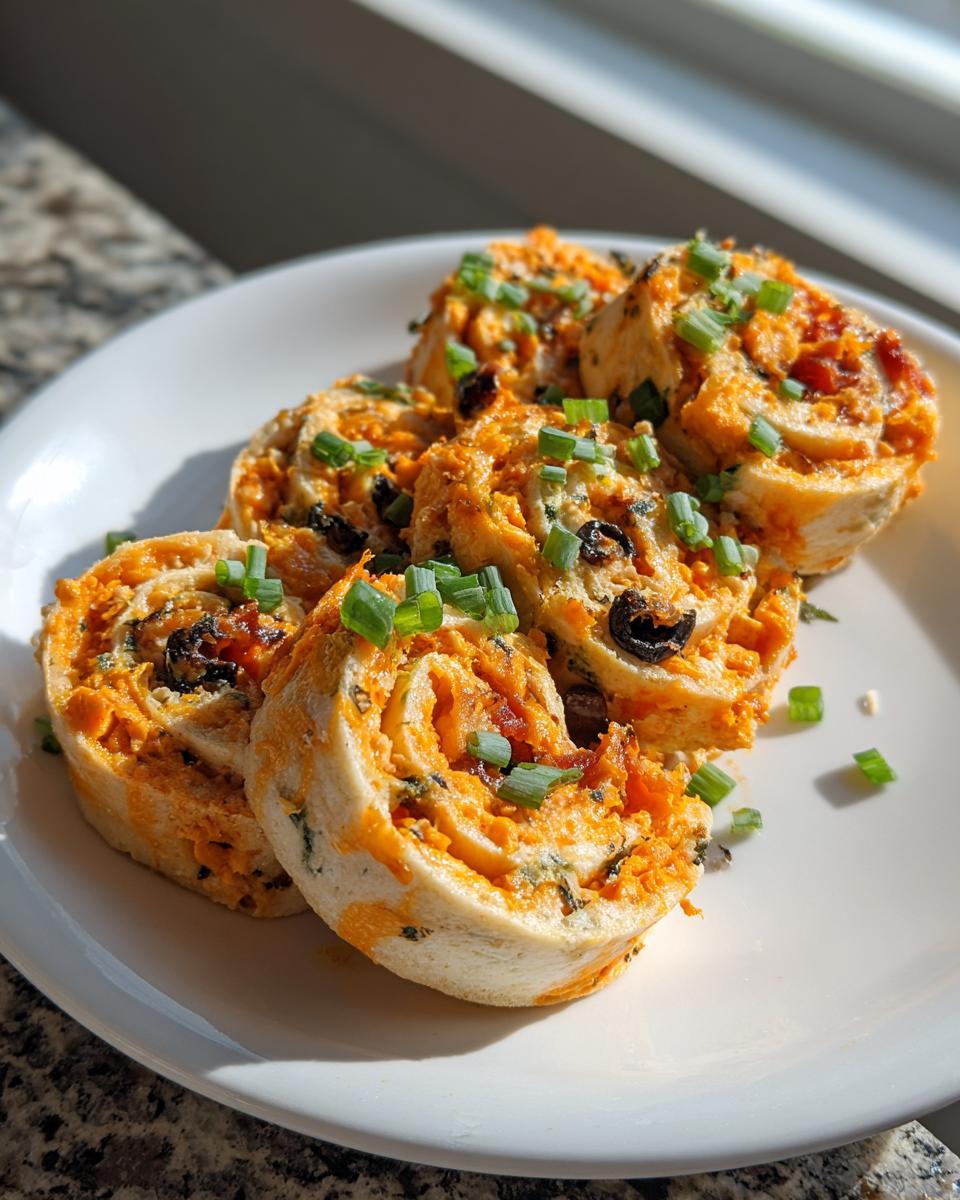
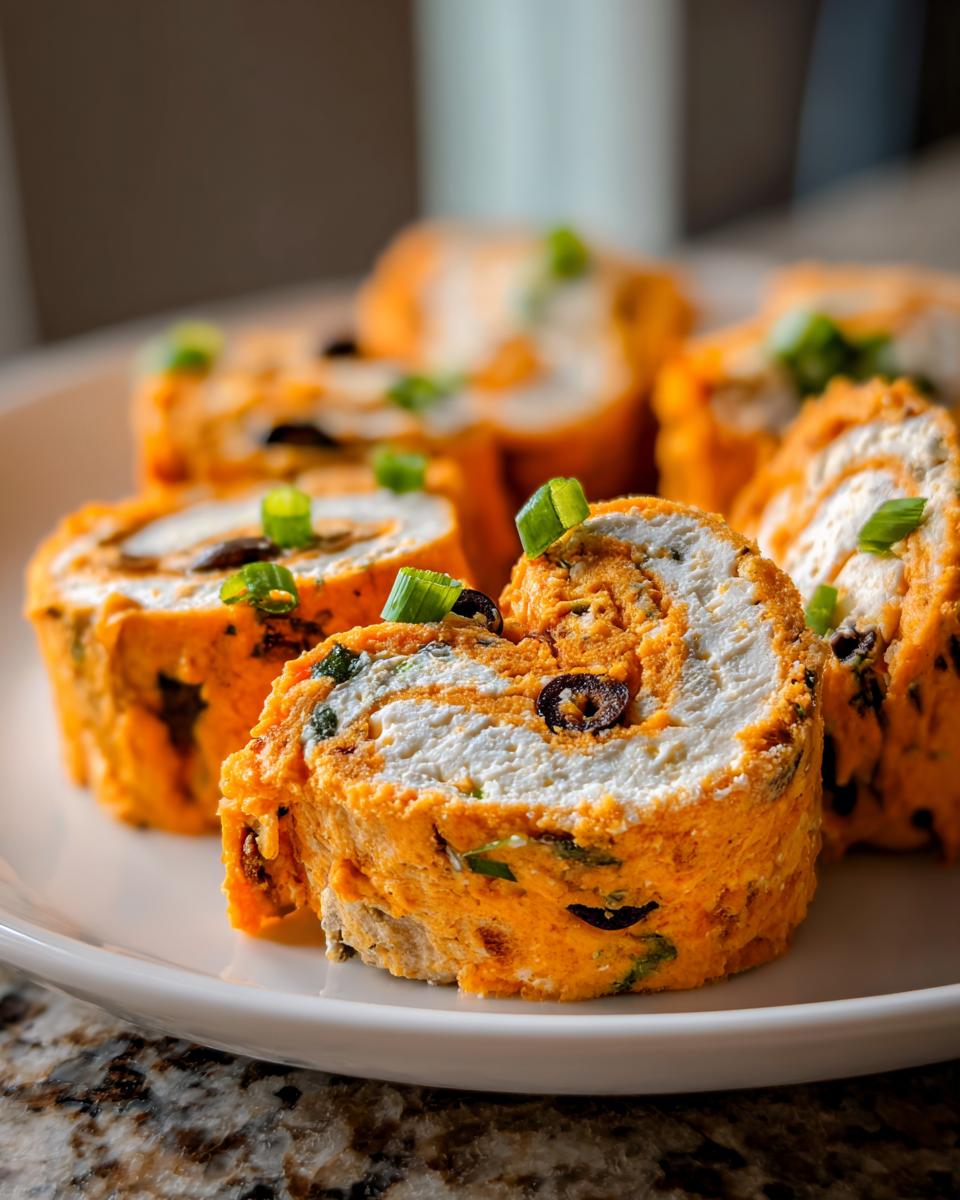
- Optional additions: A half cup of black olives and a quarter cup of green onions.
Ingredient Notes and Simple Substitutions
Let’s talk specifics, because these make or break your spread. First, that cream cheese? It simply must be softened to room temperature. If you try to mix cold cream cheese with the seasoning, it lumps up, and those lumps translate directly to patchy spots in your finished pinwheels. You end up stretching the tortilla too thin trying to spread the hard bits, and then *snap*—disaster!
For the seasoning, stick to the packet unless you have a favorite homemade blend. It’s calibrated perfectly for the amount of cream cheese we use. If you don’t love the Mexican blend cheese, sharp cheddar or Monterey Jack melts really well and adds a lovely tang. And those onions and olives? Toss ’em out if no one in your crowd likes them. They add color and texture, but they are totally optional extras for these simple tortilla pinwheels.
Step-by-Step Instructions for Simple Tortilla Pinwheels
Alright, let’s get rolling! This whole process, minus the chill time, clocks in at barely fifteen minutes, I promise. That’s why these are my go-to for any last-minute need. Precision here is what makes them look professional when you are all done. We’re building flavor right into the spread, so pay attention to that cream cheese! If you’re looking for more quick meals, check out some of my favorite easy weeknight dinners.
Mixing the Creamy Taco Filling
First things first, make sure that cream cheese has been sitting out! It needs to be soft enough to yield easily when you push it—not melted, just pliable. Toss the eight ounces of softened cream cheese into a bowl with that full packet of taco seasoning. I use my little handheld electric mixer for this because, honestly, my arm gets tired, but you can use a sturdy spoon. Mix it until there are absolutely no white streaks left. It should be a uniform, zesty orange color, ready to blanket your tortillas.
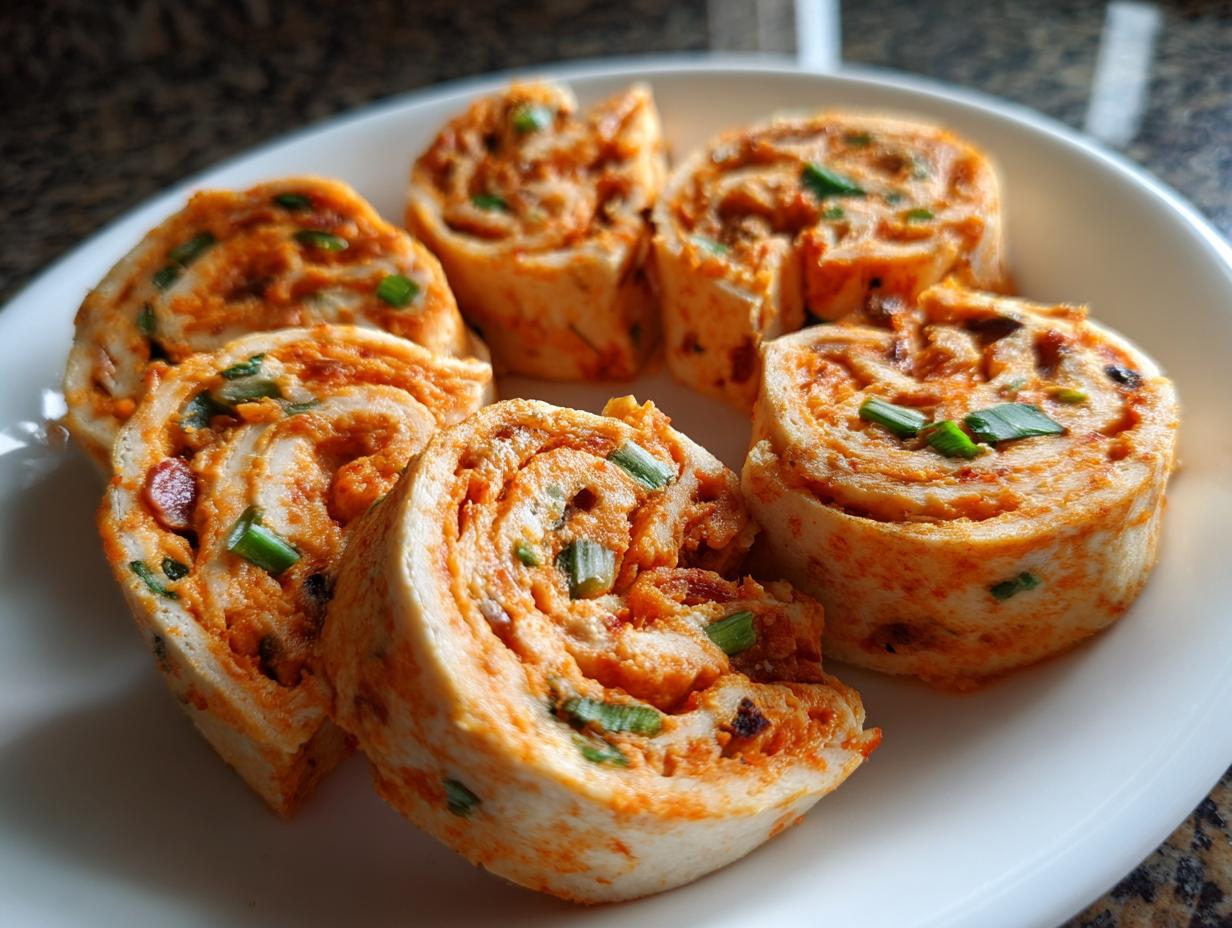
Assembling and Rolling Your Taco Pinwheels
Grab one tortilla at a time. You want to spread that filling out evenly across the surface. Don’t try to make it too thick, or it won’t roll! Spread it almost to the very edge, but here’s the trick: leave about a half-inch border completely clear along one of the long sides. This little bare edge acts like a seal to keep your taco pinwheels tucked in tight. Once spread, sprinkle on your cheese and any optional goodies, then roll it up *tightly* starting from the opposite, fully covered edge. Think of rolling a tight sleeping bag! You can see how they do this over at Fiesta Roll Ups too; they get that perfect spiral look.
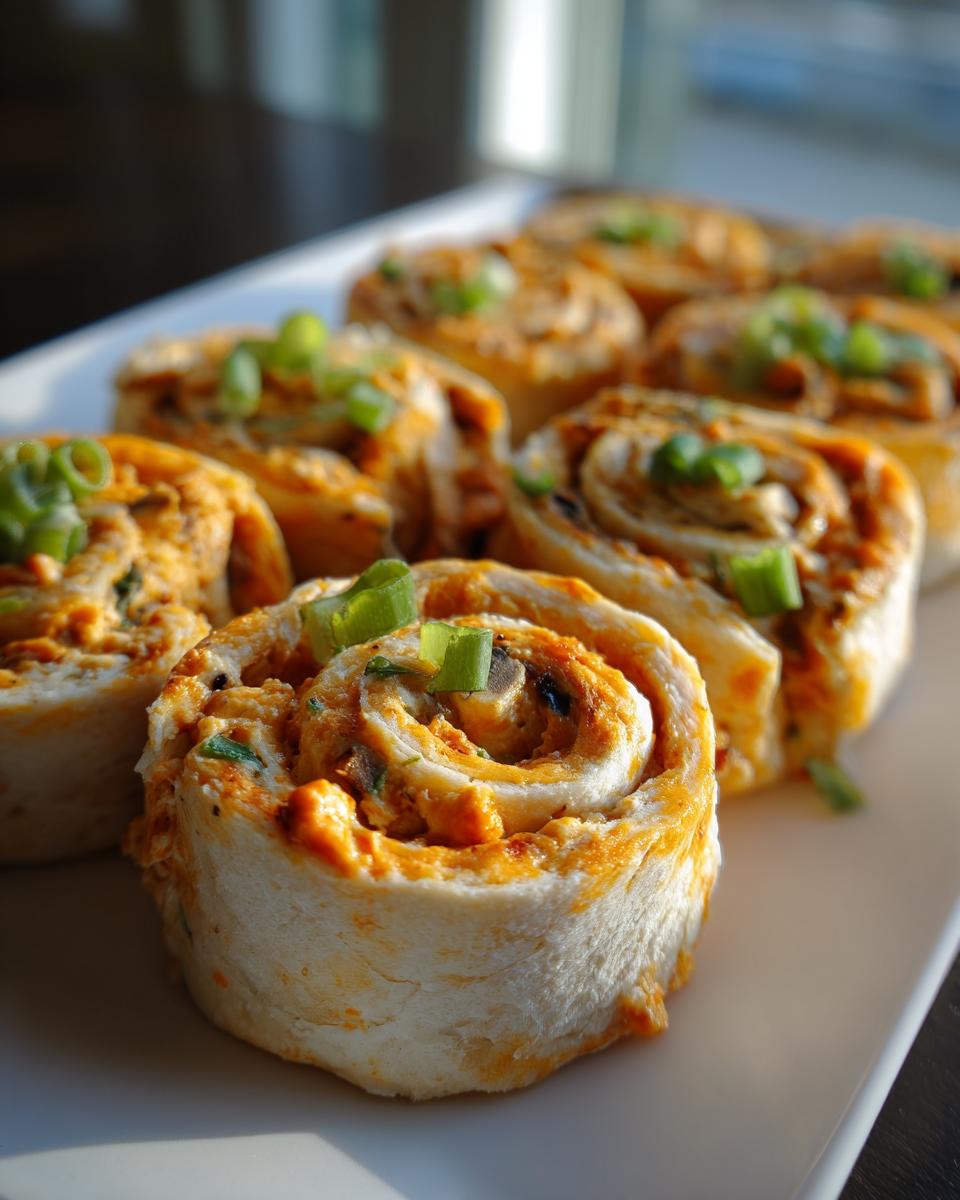
Chilling for Perfect Bite Sized Appetizers
This is the most important (and hardest) part: patience! Once you have your log rolled, wrap it super snugly in plastic wrap—you want that plastic to press right against the tortilla to keep the shape firm. These need at least one full hour in the fridge. If you’re making them for a big event, wrap them tight and leave them overnight, up to 24 hours; that chilling time firms everything up so right before serving, you can slice them up perfectly. This prevents squishing when slicing, which is a total nightmare if you try immediately. If you need more easy recipes that hold up well, you should totally check out my baked chicken parmesan sometime!
Tips for Making the Best Make Ahead Appetizers
When you are planning a party, knowing you can get something completely done ahead of time is such a relief. These make ahead appetizers are amazing for that exact reason! Chilling is crucial here, but let me tell you, I learned the hard way just how crucial it is.
The first time I made these for a big football viewing party, I was running late, so I only chilled the logs for about thirty minutes. I thought, “Eh, that’s enough, right?” Wrong! When I tried to slice them, the warm cream cheese just squished out the sides, and the pretty swirls completely flattened into sad little cheese puddles spread across the cutting board. I had to throw the whole batch in the freezer for ten minutes just to firm them up enough to cut! It worked, but wow, what a mess. Never again!
Now, I swear by letting my rolls chill for at least four hours, but ideally overnight. Here are a few other things I learned that make these flavor packed roll ups absolutely perfect every time.
- The Double Wrap is Your Friend: After you tightly wrap the log in plastic wrap, I always take a piece of foil and wrap that exterior layer too. The foil provides extra structural support and keeps the outside of the tortilla from drying out if you chill them for the full 24 hours. It sounds like extra work, but it truly keeps them pristine.
- Slice Right Before Serving: Even though you can prep them ahead, don’t slice them until about twenty minutes before guests arrive. Sliced pinwheels can start to look a little dry around the edges if they sit out too long on the platter, especially these simple fiesta snacks. Slice, arrange, and serve immediately for the best look.
- Don’t Overfill The Edges: I mentioned leaving that small border earlier, but I want to emphasize it again. If you spread the cheese mixture too close to the edge you leave bare, it will ooze out during rolling and stick to the plastic wrap, gluing your wrap to the filling. Check out how folks handle their filling placement over at Tasty Colours—they keep it neat!
- Don’t Forget Meal Prep Extras: When I’m doing a big prep session like this, I often make a batch of my egg muffins simultaneously. Knocking out two make-ahead items in one afternoon seriously saves my sanity during the actual party day!
Serving Suggestions for Your Mexican Pinwheel Recipe
Even the prettiest appetizer needs a good supporting cast, right? These Mexican pinwheel recipe beauties are packed with flavor on their own, but offering a couple of dips on the side is what elevates them from tasty snack to must-have party food. It lets everyone customize their little spiral just the way they love it. And trust me, having a warm dip next to these cool, creamy rolls is just heavenly.
My absolute go-to setup involves those three amigos: salsa, sour cream, and guacamole. Seriously, you can never go wrong with that trio. The tartness of a good fresh salsa cuts right through the richness of that cream cheese filling perfectly. For the sour cream, if you want to make it feel a little fancier, just mix in a tiny bit of lime juice and a pinch of salt—instant upgrade!
Now, if you’re feeling ambitious, and you have a little stove/slow cooker time, sometimes I make a batch of my quick homemade nacho cheese sauce. Pour that warm, gooey cheese sauce into a tiny slow cooker right next to the platter of chilling taco pinwheels. The visual contrast between the cool, colorful rolls and the steaming, bright yellow cheese is just killer. It makes the spread look so much more generous, even though it took virtually no extra effort!
Also, don’t forget fresh chopped cilantro sprinkled over the platter right before serving! It adds a necessary pop of green and a bit of fresh herbal flavor that just lifts everything up. It’s those tiny touches that make people ask, “Wow, how long did you spend making these?”
Storage and Reheating Instructions for Taco Pinwheels
Because these are the ultimate crowd pleasing finger foods, knowing how to store them properly is key so they look fantastic when you finally serve them! Since these are straight-up tortilla roll-ups without any baking step, they behave differently than, say, a baked pastry. I’m going to be direct: please don’t try to reheat these! Seriously, putting these in the microwave just turns the tortilla rubbery and melts the cream cheese into a greasy mess. It totally defeats the purpose of the pretty spiral shape.
The absolute best way to handle these is using that chilling time we talked about. If you’ve made the logs but haven’t sliced them yet—this is the best way to store them for later.
- Storing the Uncut Logs: Once you’ve rolled them up tight and wrapped them exceptionally well in plastic wrap (and maybe foil, like I suggested!), they are perfectly happy in the refrigerator for up to 24 hours. That long chill firms them up nicely, making the slicing process super clean later.
- Storing Sliced Pinwheels: If you sliced them ahead of time—maybe you’re really organized!—you can store the slices, too. Wrap the platter or container tightly in plastic wrap. They should be okay for about 12 hours in the fridge, but after that, the edges start to dry out a little bit.
For the best presentation and texture, I always slice them just an hour or two before the guests arrive. They stay cool, they look fresh, and that cream cheese keeps its light body perfectly. If you must serve leftovers later, just bring the platter out of the fridge about twenty minutes before you want to eat them so they lose that icy chill, but keep them covered until the last minute. That’s my secret to keeping these little flavor-packed bites looking perfect from the first guest to the last!
Frequently Asked Questions About Taco Pinwheels
I get asked so many great questions about these snacks! Since everyone wants to customize their party spreads, I figured I’d tackle the most common curveballs people throw at this easy recipe. Honestly, once you have the base down, you can tweak them endlessly! But remember, we’re talking about these yummy, cheesy tortilla roll ups here—not the puff pastry kind, which is a whole different beast!
Can I use puff pastry instead of tortillas for this recipe?
That’s a great question! People often see the words “pinwheels” and immediately think of flaky pastry, but this recipe is specifically developed for soft flour tortillas to keep it super fast and no-bake. If you wanted to experiment with puff pastry, you absolutely could, but you’d need to bake them! You’d spread that creamy filling on the dough sheets, roll them up, chill them thoroughly, then slice and bake usually around 375°F until golden brown. It makes for a delicious, rich appetizer, but it drastically changes the prep time—baking suddenly enters the picture, moving us away from that 10-minute prep goal! For this recipe, stick to tortillas for quick party snacks.
Can I add cooked ground beef or chicken to my taco pinwheels?
Oh yes, you totally can add meat if you want to make these even heartier, turning them into a real meal component rather than just a light snack! If you do, you need to make sure whatever meat you use is cooked, drained *completely* of all grease, and cooled down to room temperature before mixing it into the cream cheese base. Too much moisture or heat will cause the cream cheese to break down faster. I usually suggest no more than a half cup of fully cooked, finely crumbled beef per batch of ten tortillas. This keeps our creamy taco pinwheels structurally sound for chilling and slicing.
How long can I keep homemade taco pinwheels in the fridge?
This depends on if they are sliced or not! As I mentioned in the tips section, the uncut logs are best kept wrapped tightly and chilled for up to 24 hours. They honestly taste better when they have a full overnight chill. If you slice them, they are still good for maybe 12 hours, but they look best when sliced the day you plan to serve them because those cut edges can dry out a tiny bit. Nobody wants a dry edge on their taco pinwheels!
What’s the best dipping sauce to serve with these simple fiesta snacks?
Honestly, these are tasty enough to skip dipping, but serving something alongside them always makes them feel more festive! For simple fiesta snacks, you want contrast. Cool, creamy dips might be too much with the creamy filling, so I stick to bright, acidic flavors. A chunky salsa, a smoky chipotle sour cream (just mix a dash of chipotle powder into sour cream), or really good quality guacamole are the winning choices. You can find some great inspiration for vibrant dips over at Chloe’s site, too!
If you’re planning ahead, you can certainly make a batch of my easy dips early in the week to go alongside these!
Estimated Nutritional Data for Simple Fiesta Snacks
I know a lot of you track nutrition, and while I always stress these are estimates due to brand variations—plus, let’s be real, they are party food!—I like to give you a ballpark idea for these simple tortilla pinwheels. This calculation is based on the recipe using all listed ingredients (including olives and onions) and yielding 40 pinwheels.
- Serving Size: 2 pinwheels
- Calories: Approximately 150
- Fat: Around 9g
- Carbohydrates: About 12g
- Protein: Roughly 5g
Please remember that these values can swing quite a bit depending on the specific brand of tortilla, the fat content of your cream cheese, and how generous you are with the seasoning packet! For full transparency, I always note that exact values will vary based on your specific ingredient choices.
Share Your Experience Making These Taco Pinwheels
I truly hope you get to enjoy the ease and flavor that these taco pinwheels bring to your next gathering. They are a favorite in my kitchen, and I love knowing they made your party planning easier too!
When you make them, please come back and leave a rating below—I’d love to know how quickly they disappeared! Tell me in the comments if you stuck to the basic recipe or if you tried adding meat or a fun spice twist. Did the kids love them as much as the adults did? Don’t forget you can always reach out and let me know how your quick party snacks turned out by connecting with me on my contact page!
PrintEasy Cheesy Taco Pinwheels

Make these quick and cheesy taco pinwheels using tortillas. They are a simple, crowd-pleasing appetizer perfect for game days or parties.
- Prep Time: 15 min
- Cook Time: 0 min
- Total Time: 15 min
- Yield: 40 pinwheels 1x
- Category: Appetizer
- Method: Chilling/No Bake
- Cuisine: Mexican Inspired
- Diet: Vegetarian
Ingredients
- 10 large flour tortillas
- 8 ounces cream cheese, softened
- 1 packet (1 ounce) taco seasoning mix
- 1 cup shredded Mexican blend cheese
- 1/2 cup finely chopped black olives (optional)
- 1/4 cup finely chopped green onions (optional)
Instructions
- In a medium bowl, combine the softened cream cheese and taco seasoning. Mix until smooth and fully combined.
- Spread an even, thin layer of the cream cheese mixture over the entire surface of each tortilla, leaving a small border on one edge.
- Sprinkle the shredded cheese, black olives, and green onions evenly over the cream cheese layer on each tortilla.
- Starting from the long edge opposite the small border, tightly roll up each tortilla.
- Wrap each rolled tortilla tightly in plastic wrap. Chill in the refrigerator for at least 1 hour, or up to 24 hours, to firm up the rolls.
- When ready to serve, unwrap the chilled rolls and slice each one into 1-inch thick pinwheels.
- Arrange the taco pinwheels on a serving platter. Serve immediately.
Notes
- For make ahead appetizers, keep the rolls wrapped tightly in the refrigerator for up to one day before slicing.
- If you prefer a spicier flavor, add 1/4 teaspoon of cayenne pepper to the cream cheese mixture.
- These bite sized appetizers are great served with salsa or sour cream for dipping.
Nutrition
- Serving Size: 2 pinwheels
- Calories: 150
- Sugar: 1
- Sodium: 350
- Fat: 9
- Saturated Fat: 5
- Unsaturated Fat: 4
- Trans Fat: 0
- Carbohydrates: 12
- Fiber: 1
- Protein: 5
- Cholesterol: 25