Adorable Pencil Sugar Cookies for Teacher Appreciation
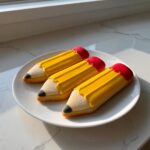
Make these easy decorated sugar cookies shaped like pencils as a thoughtful, portable gift for Teacher Appreciation Week or back to school.
- Prep Time: 45 min
- Cook Time: 10 min
- Total Time: 155 min
- Yield: 2 dozen 1x
- Category: Dessert
- Method: Baking
- Cuisine: American
- Diet: Vegetarian
Ingredients
Scale
- 3 cups all-purpose flour
- 1 teaspoon baking powder
- 1/2 teaspoon salt
- 1 cup unsalted butter, softened
- 1 1/2 cups granulated sugar
- 1 large egg
- 1 teaspoon vanilla extract
- 1/4 cup milk
- Royal Icing Ingredients:
- 4 cups powdered sugar, sifted
- 3 tablespoons meringue powder
- 6 tablespoons warm water
- Food coloring (yellow, red, black, brown)
Instructions
- In a medium bowl, whisk together the flour, baking powder, and salt. Set aside.
- In a large bowl, beat the softened butter and granulated sugar with an electric mixer until light and fluffy. This is key for soft cookies.
- Beat in the egg and vanilla extract until combined.
- Gradually add the dry ingredients to the wet ingredients, alternating with the milk, mixing on low speed until just combined. Do not overmix.
- Divide the dough in half, wrap each half in plastic wrap, and chill for at least 1 hour.
- Preheat your oven to 375°F (190°C). Line baking sheets with parchment paper.
- On a lightly floured surface, roll out one portion of the chilled dough to about 1/4 inch thickness.
- Use a pencil-shaped cookie cutter to cut out shapes. Place them on the prepared baking sheets.
- Bake for 8 to 10 minutes, or until the edges are lightly golden. Let the cookies cool on the baking sheet for 5 minutes before transferring them to a wire rack to cool completely.
- Prepare the royal icing: In a bowl, whisk together the powdered sugar and meringue powder. Gradually add the warm water, mixing until smooth. The icing should be thick enough to hold a line when drizzled.
- Divide the icing into small bowls. Color one portion yellow for the pencil body, a small amount red for the eraser, and a small amount brown or black for the tip. Keep the remaining icing white for the ferrule (metal band).
- Fit piping bags with small round tips. Fill the bags with the colored icing.
- Outline the entire cookie shape with yellow icing. Let the outline dry for about 15 minutes.
- Flood the center of the cookie with the yellow icing, gently shaking the cookie to spread the icing evenly. Let this layer dry completely (several hours or overnight).
- Once the yellow is dry, pipe a thin band of white icing near the bottom for the ferrule. Let it set slightly.
- Pipe a small section of red icing above the white band for the eraser. Let it set.
- Pipe a small brown or black triangle at the bottom point for the pencil tip.
- For added detail, use a thin black food coloring marker to draw a small line or detail on the yellow body if desired.
Notes
- For easy cleanup, use a silicone baking mat instead of parchment paper.
- If your royal icing becomes too stiff while decorating, add water a few drops at a time until you reach the right consistency.
- These decorated sugar cookies store well in an airtight container at room temperature for up to one week.
Nutrition
- Serving Size: 1 cookie
- Calories: 180
- Sugar: 22g
- Sodium: 110mg
- Fat: 8g
- Saturated Fat: 5g
- Unsaturated Fat: 3g
- Trans Fat: 0g
- Carbohydrates: 26g
- Fiber: 0g
- Protein: 2g
- Cholesterol: 25mg