
Oh, the tragedy of a mushy, steamed sweet potato! Doesn’t it just drive you crazy? You wait nearly an hour for that gorgeous orange color, only to cut it open and find a soggy interior and skin that sticks to the pan. I’ve been there, trust me. When I was developing recipes both as a student studying nutrition and later in a professional test kitchen, I made it my mission to solve this once and for all. This isn’t just another recipe; this is the foolproof method for perfectly baked sweet potatoes that guarantees a fluffy inside and beautifully crisp skin every single time. We are skipping the foil—that’s the secret!
My goal here at Cooking by Jade is to give you methods that actually work and feel reliable. Because I understand both the science of food and the real-life need for quick, satisfying meals, you can trust that this technique is solid. Get ready to ditch the frustration and meet your new favorite healthy side dish!
- Why This No-Foil Method Creates the Best Baked Sweet Potatoes
- Ingredients for Perfectly Baked Sweet Potatoes
- How to Prepare Baked Sweet Potatoes: Step-by-Step Instructions
- Serving Suggestions and Topping Ideas for Baked Sweet Potatoes
- Tips for Success with Oven Baked Sweet Potatoes
- Storage and Reheating Instructions for Leftover Baked Sweet Potatoes
- Frequently Asked Questions About Baked Sweet Potatoes
- Estimated Nutritional Data for Baked Sweet Potatoes
- Share Your Perfectly Baked Sweet Potato Results
Why This No-Foil Method Creates the Best Baked Sweet Potatoes
So, why ditch the foil? It seems crazy, right? Most recipes tell you to wrap them up tight, but that just steams them! When you wrap those beautiful sweet potatoes in foil, you lock in all the moisture, and that’s how you get that sad, soggy bottom layer you are trying so hard to avoid. Nobody wants that gummy texture!
Skipping the foil allows the natural steam generated inside the potato to escape beautifully. Plus, it lets the exterior air circulate around the whole thing. This guarantees you get tender, fluffy baked sweet potatoes instead of microwaved approximations.
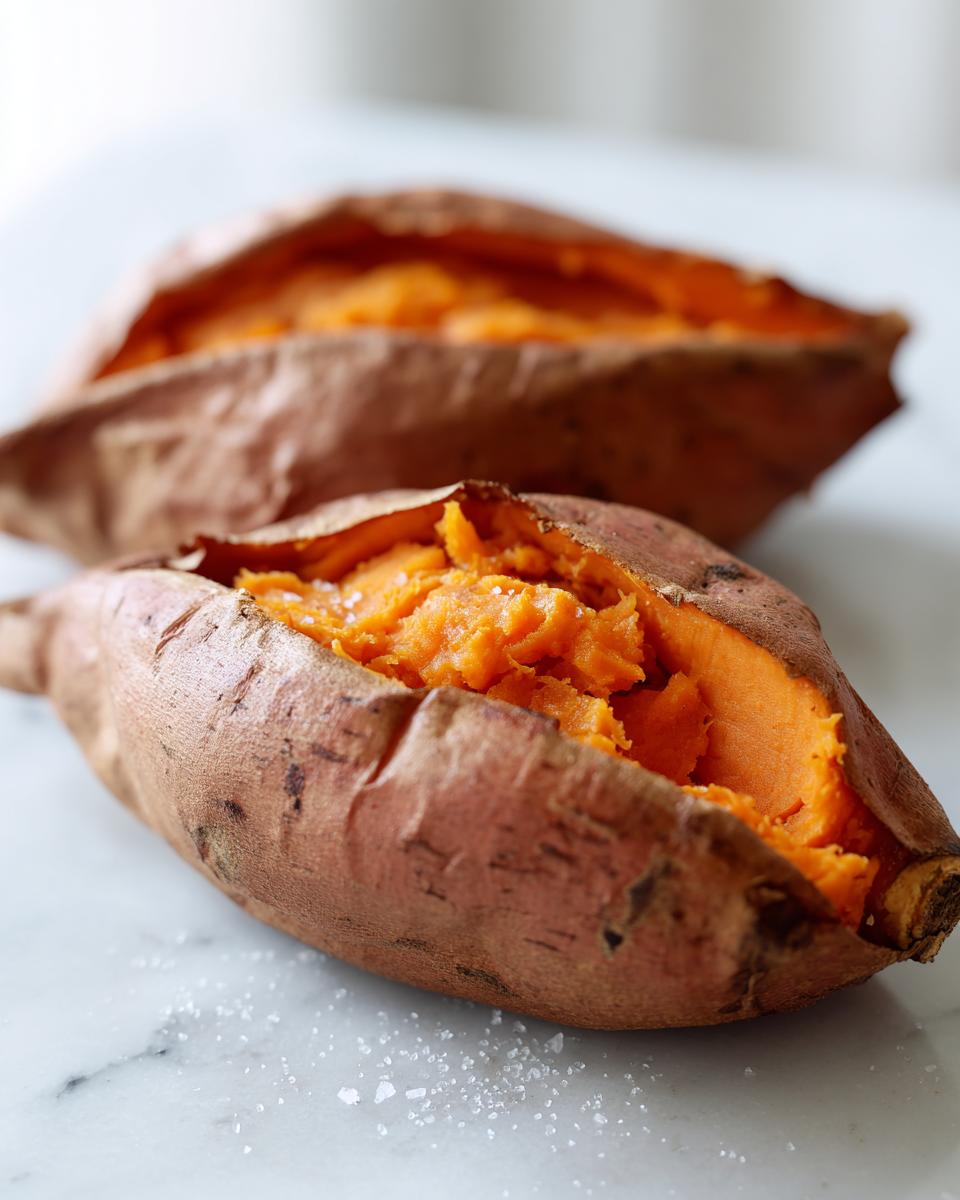
Achieving a Fluffy Baked Sweet Potato Interior
The first key to fluffiness is letting that steam escape right from the start. You absolutely have to prick them deep all over with a fork before they even look at the oven. That’s their little air vent! Then, putting them right onto the middle rack—no pan needed!
This lets the heat penetrate evenly. Honestly, my favorite trick is squeezing them gently right when they come out. If they give easily, you know the inside is going to be like sweet, velvety clouds. If they still feel hard in the middle, give them another five minutes; they’re tough cookies!
The Secret to Crispy Skin Sweet Potatoes
This is where the magic really happens for that satisfying crust. We are treating the skin almost like the skin on a roasted regular baking potato. You want to rub them down with just a light layer of oil—I use olive oil, but coconut oil is amazing too. That fat helps the skin crisp up.
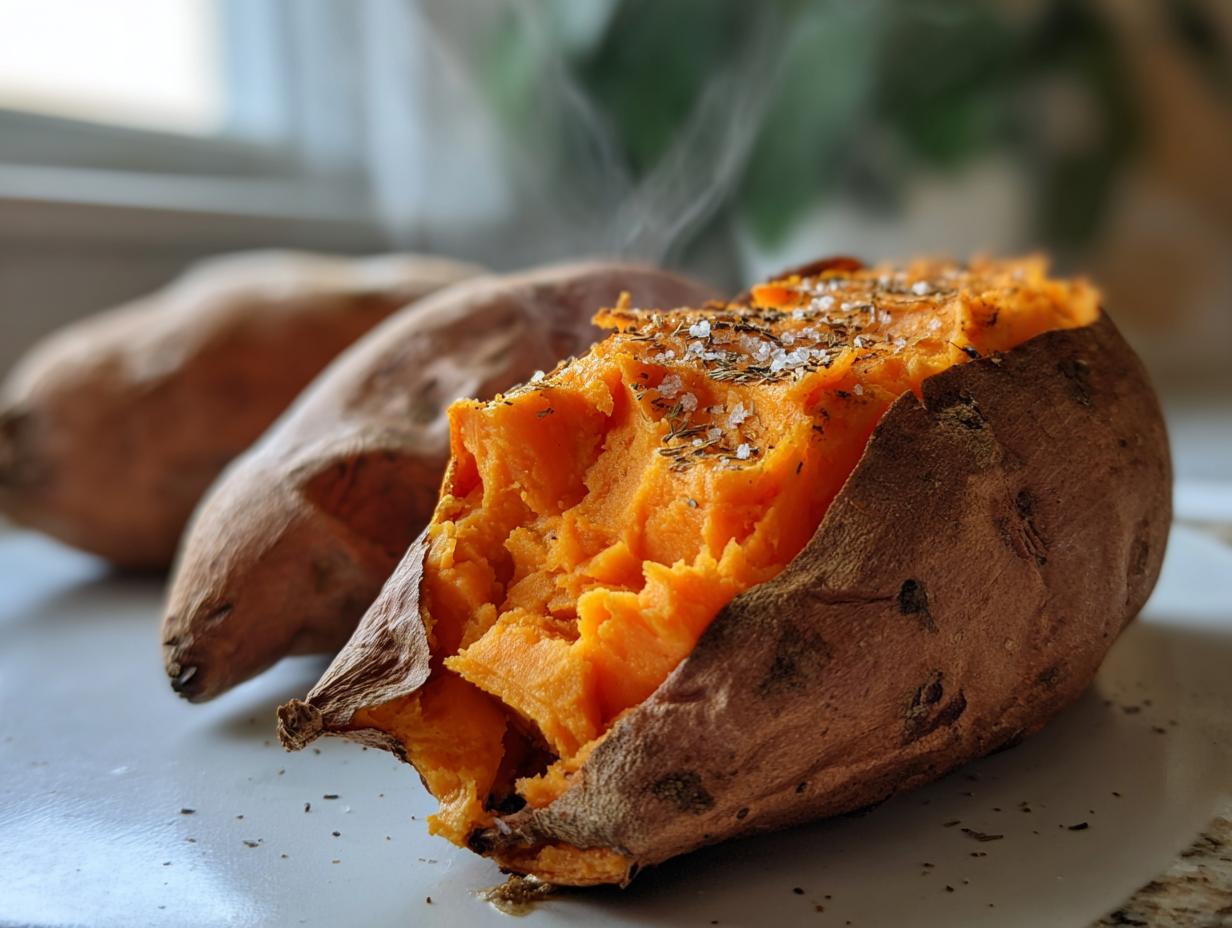
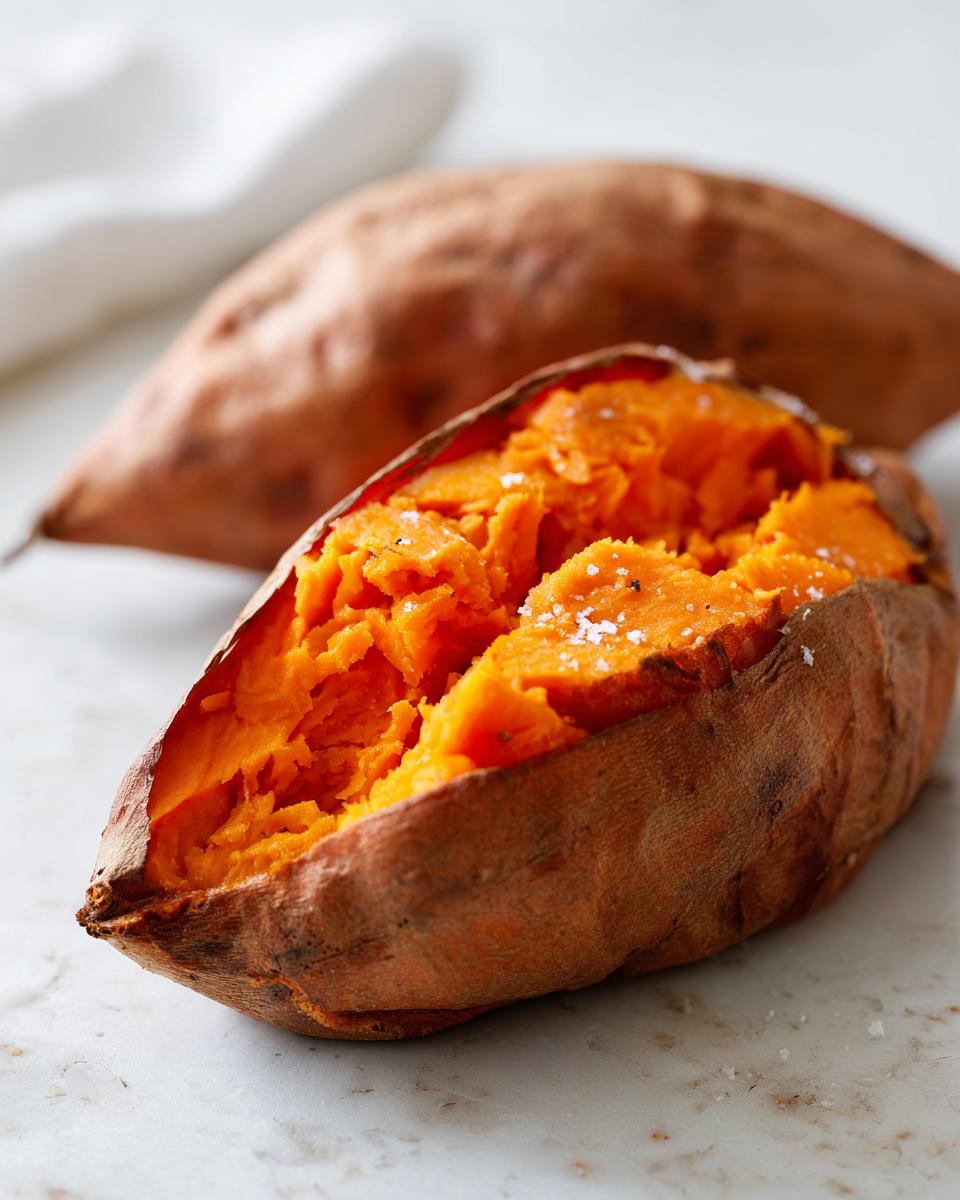
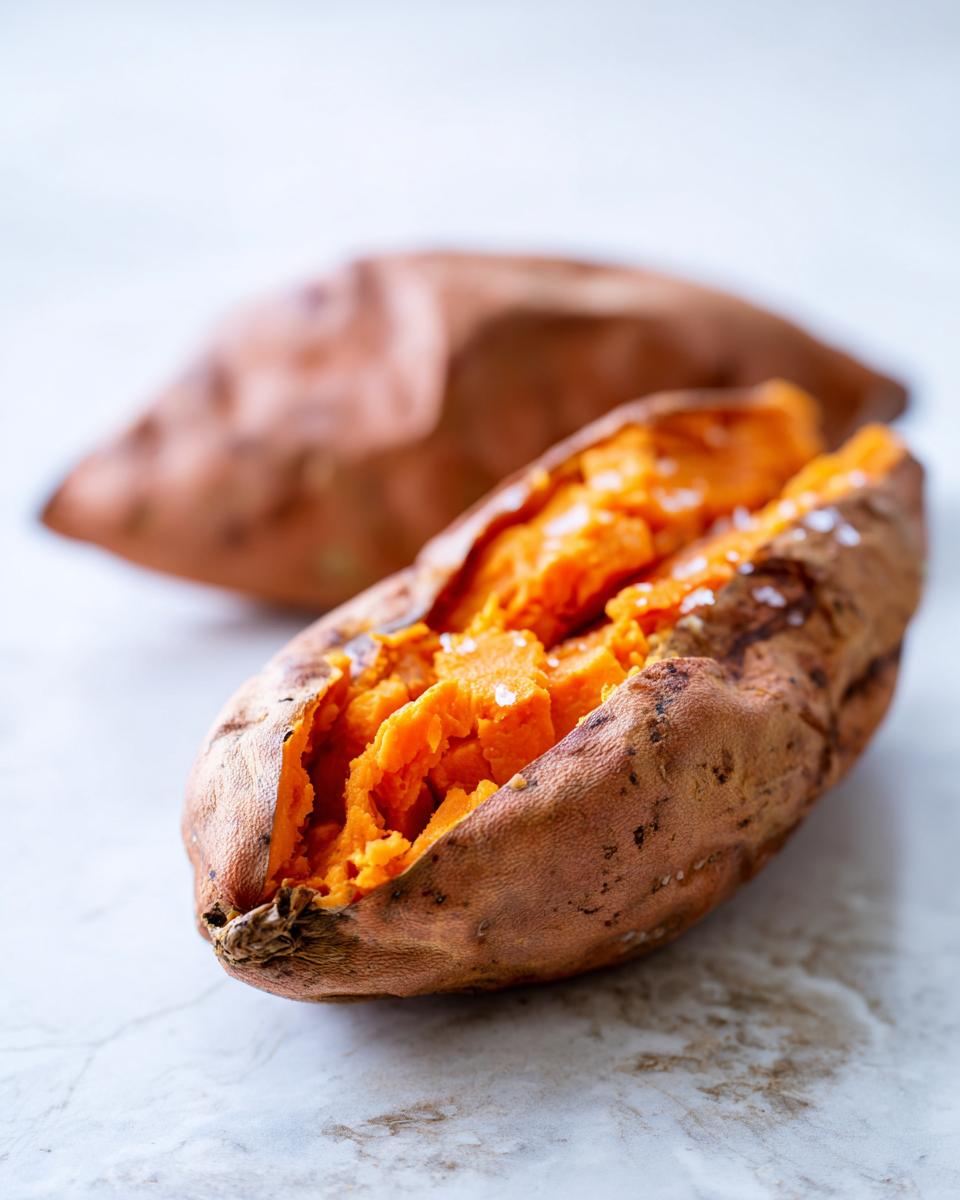
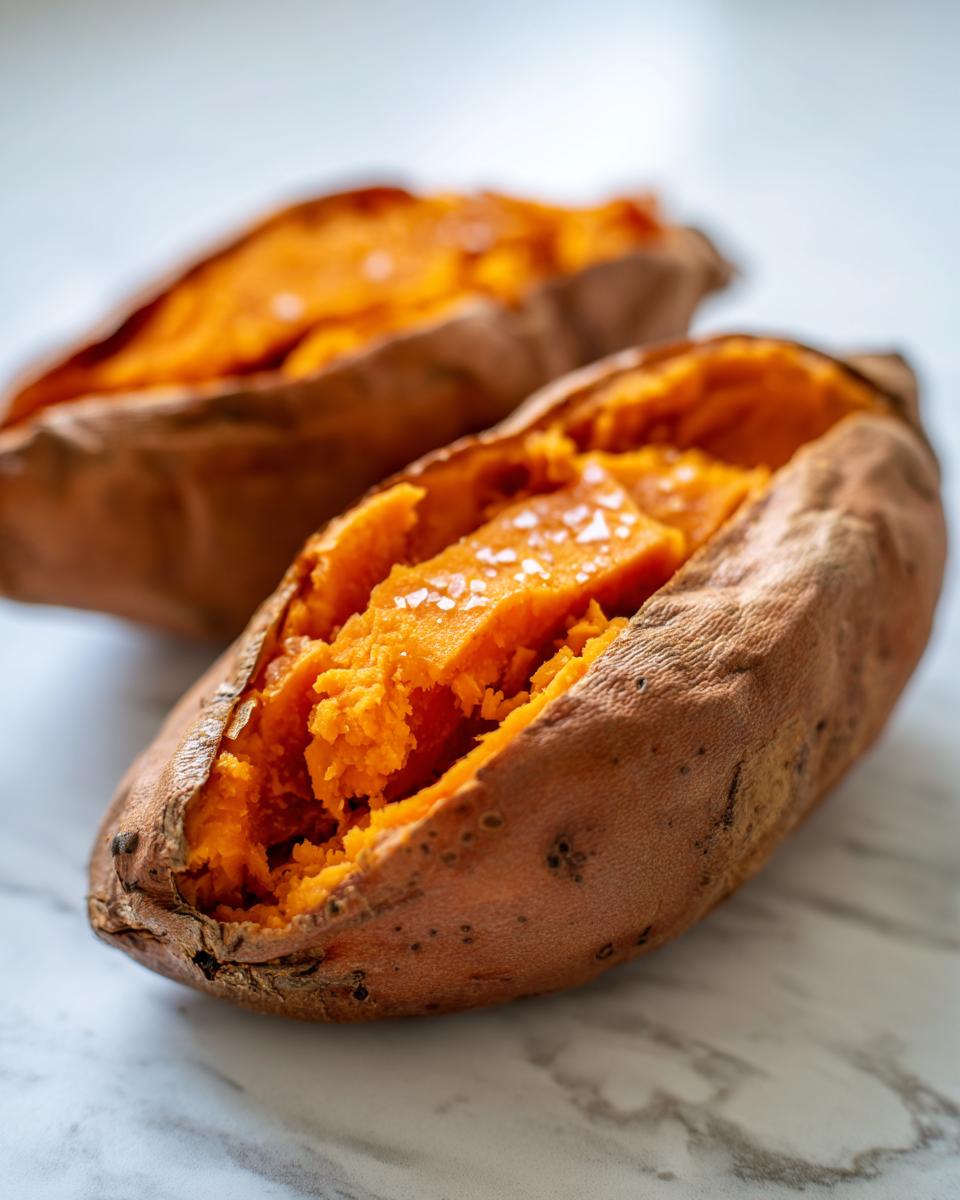
Then, we hit it with coarse salt. The salt draws out just a tiny bit of surface moisture while the oil protects it, resulting in truly crispy skin sweet potatoes. When they sit directly on the metal oven rack, the bottoms can crisp up too. That salty crunch against the sweet interior? Perfection!
Ingredients for Perfectly Baked Sweet Potatoes
I love that this recipe requires next to nothing, which proves that simple vegetable side dishes can still pack a huge flavor punch. You probably have all of this sitting in your pantry right now! When you are focusing on making truly fluffy baked sweet potato centers, you don’t need complicated additions here—the sweet potato does most of the heavy lifting.
Here is what you’ll need for four great servings of baked sweet potatoes:
- 4 medium sweet potatoes, scrubbed clean (Make sure they are roughly the same size so they cook evenly!)
- 1 tablespoon olive oil (or coconut oil, if you want a slightly warmer flavor)
- 1 teaspoon coarse salt (Please use coarse salt; the fine stuff dissolves weirdly)
- 1/2 teaspoon black pepper
That’s it! We save all the fancy flavors—like maple or cinnamon—for the big moment right before you eat them. Simple ingredients handled correctly make the best results, period.
How to Prepare Baked Sweet Potatoes: Step-by-Step Instructions
Ready to get these beauties into the oven? Getting perfect baked sweet potatoes is all about a few very specific actions before they even see the heat. This is the technique that takes them from ‘okay’ to ‘I need to make these again next week.’ Don’t rush the prep, and you’ll be rewarded!
Preheating and Prepping the Potatoes
First things first: crank that oven up! We need 400 degrees Fahrenheit, nice and hot. Make sure you get that heat fully established before anything goes inside. While it’s heating, grab your fork. You need to prick each sweet potato deeply, maybe 6 or 8 times all the way around. This is critical science—it gives the inside steam somewhere to go so your sweet potato doesn’t explode or turn watery! After the pricking party, take your tablespoon of olive oil and rub it lightly over the entire skin. Then, get aggressive with the salt and pepper. I’m telling you, the salt is key!
Baking Time and Checking for Doneness
This is where we rebel against the foil! Skip the wrapping completely and place those seasoned potatoes directly onto the middle rack of your oven. They need that airflow for the skin to get wonderful and crisp. They will bake anywhere from 45 minutes up to a full hour, depending on how big those potatoes are. Don’t just trust the clock, though! You have to check them right. Gently squeeze the sides—if the sweet potato yields easily under gentle pressure, it’s ready. If it still feels rock hard, give it another 10 minutes. Once they pass the squeeze test, cut them open lengthwise and use your hands right away to gently push the sides so that fluffy interior puffs right up. Serve them fast!
If you want to adapt this base for something richer, like a sweet potato brownies-style filling later, you can totally scoop that soft flesh out now!
Serving Suggestions and Topping Ideas for Baked Sweet Potatoes
Now that you have these perfectly cooked, fluffy baked sweet potatoes, the fun really begins! You’ve mastered the technique, so now we get to customize. Honestly, sometimes I eat mine straight out of the skin with just a little salt, but when I want to turn this simple side into something special, the toppings are everything. We can go sweet, we can go savory—the world is your oyster!
If you are looking for other ways to use sweet potatoes for the holidays, check out my recipe for candied yams—it’s a total crowd-pleaser!
Simple Toppings for a Healthy Sweet Potato Side Dish
To keep things on the lighter side, you don’t need heavy sauces. Think fresh herbs and cool dairy to balance the heat! These options make for a wonderful healthy sweet potato side dish that everyone can feel good about eating.
- A dollop of plain Greek yogurt or sour cream, finished with fresh chopped chives and a crack of black pepper. So clean!
- A big squeeze of fresh lime juice and a sprinkle of flaky sea salt. It brightens everything up.
- If you want that cozy comfort food vibe without too much sugar, you must try warming up just a little bit of butter with a dash of cinnamon and nutmeg. You can find a recipe idea for warm cinnamon butter online that pairs perfectly here.
Making Twice Baked Sweet Potatoes
This whole baked potato is the perfect launching pad for something more complex, like twice baked sweet potatoes! Right after you scoop out that gorgeous, fluffy flesh, you can mix it with things like cheese, bacon bits, pecans, or even some cream cheese if you’re feeling indulgent.
Just mix your filling right inside the sweet potato skin shell, pop it back in the oven for about 10 more minutes until it’s heated through and slightly golden on top, and boom! You’ve just turned a simple side into a stunning presentation. It feels so gourmet, but you already did the hard work when you baked the potato the first time!
Tips for Success with Oven Baked Sweet Potatoes
You’ve got the basic steps for baked sweet potatoes down, but let’s talk about what happens before they even hit the oven and how to keep leftovers fabulous. Since I spent time professionally optimizing recipes, I know that starting with the right ingredients and knowing how to store them makes a huge difference in the final fluffy texture we are aiming for.
These little expert tips are what take this from a good recipe to a go-to technique you’ll use all the time, maybe even for your easy weeknight dinners!
Selecting and Storing Your Potatoes
The quality of your sweet potato really dictates your success here. You want ones that feel firm all over. If you push gently and you feel any soft spots or mushiness, put that one back onto the pile. Those soft spots mean breakdown is already starting inside, and you won’t get that beautiful fluffy interior we prize.
Look for skin that is smooth—a few little root marks or dark eyes are fine, just avoid any deep cuts or gashes. For storage, keep them somewhere dark, cool, and dry, like your pantry, but definitely not the refrigerator! The cold temperatures mess with their starches and make them taste kinda woody, which defeats the whole purpose of a great side dish.
If you are meal prepping, the best thing to do is bake them (like in our main recipe!), let them cool completely, and then stick them whole in an airtight container in the fridge. They are perfect for up to four days that way!
Storage and Reheating Instructions for Leftover Baked Sweet Potatoes
One of the things I absolutely love about making baked sweet potatoes this way is how perfectly they hold up as leftovers. Seriously, they make the absolute best meal prep! Since this method skips the foil and cooks them perfectly, you don’t end up with that sad, dried-out sweet potato the next day. It’s a win-win for busy weeks!
I always plan on making at least four. If you are doing any sweet potato meal prep, trust me, these are the ones to make ahead.
For storage, the best way to keep them is to let them cool completely after baking, and then store them whole. Toss them into an airtight container or even a big zip-top bag. I find they last beautifully in the fridge for about three to four days. Don’t bother cutting them open until right before you eat them, even if you plan to eat them cold!
When it comes to reheating, you have two options, and you have to choose wisely depending on what texture you want. If you want to get that wonderful skin crisp again, you absolutely must use the oven. Wrap the still-whole potato loosely in foil—yes, we bring foil back in for reheating!—and heat at 350 degrees Fahrenheit for about 15 to 20 minutes, or until it’s hot all the way through.
If you’re in a rush, the microwave works, but be warned: it’s the fast track back to that soft, steamed texture we worked so hard to avoid initially. If you do microwave, just zap it for about a minute or two until it’s soft, and be sure to slice it open right away so the steam escapes! Don’t forget your favorite toppings, like that cinnamon butter, when you reheat them!
Frequently Asked Questions About Baked Sweet Potatoes
I always get questions when I post these perfect baked sweet potatoes online. People are worried about them taking too long, or they just can’t believe the no-foil trick works! I gathered up some of the most common things folks ask me when they try this method for the first time. Hopefully, these quick answers clear everything up so you can bake with confidence!
Can I use aluminum foil when making baked sweet potatoes?
This is the big one! For this specific method, the answer is a hard no—at least not while baking. We skip the foil entirely because wrapping them traps steam, and steam is the enemy of that crispy skin we worked so hard to achieve. If you wrap them, you’re basically boiling them in their own jacket! Now, if you’re reheating leftovers, I sometimes loosely tent them for the last few minutes, but for the initial cook? Straight onto the rack! Trust me, this is how we get those beautifully crisp skin sweet potatoes.
What is the fastest way to cook baked sweet potatoes?
If speed is your absolute, number one priority, sorry, but the oven isn’t the fastest way, hands down. You can technically microwave a sweet potato in about 5 to 7 minutes, and that’s certainly faster! But here’s the catch: microwaved sweet potatoes are never truly fluffy; they end up steamed and a bit wet, which is the exact opposite of what we want.
If you have time to bake them for 50 minutes, you get that gorgeous, caramelized skin and the interior texture that makes a fluffy baked sweet potato so comforting. If you need them *fast*, microwave them until they are almost done, then rub them with a tiny bit of oil and pop them under the broiler for 3 minutes to crisp the skin a bit!
For more ways to cook root veggies quickly, sometimes I look at what my friends are cooking up, like these fun techniques over at Evolving Table. But for the truly best texture, nothing beats the oven bake. If you’re looking for other great vegetable ideas, check out my roasted vegetable lasagna—it’s loaded with flavor!
Estimated Nutritional Data for Baked Sweet Potatoes
Okay, everyone always asks about the numbers, especially since this is such a healthy base for so many meals. I totally get it; knowing what you’re eating is important, whether you’re tracking macros or just trying to eat wholesome food. Since these baked sweet potatoes are naturally fantastic for fiber and loaded with Vitamin A, they are already a winner!
But listen, this chart is super important: these figures only reflect the potato itself, rubbed lightly with a bit of olive oil and seasoned with just salt and pepper. The minute you start adding cinnamon butter, pecans, or loads of sour cream, these numbers shoot right up! So, use this as your baseline—your delicious, healthy starting point for whatever healthy lunch ideas you might be building!
Based on four medium potatoes prepared exactly as written in the recipe:
- Serving Size: 1 potato
- Calories: About 180
- Fat: Less than 1 gram
- Carbohydrates: 41 grams
- Fiber: 7 grams (Hello, great digestion!)
- Protein: 4 grams
- Sugar: 13 grams (All natural sweetness!)
See? That’s a powerhouse side dish right there. It’s very low in cholesterol and saturated fat because we aren’t adding anything heavy. When you build on this simple base, you control exactly how rich or light your final meal ends up being. Enjoy that fluffy interior guilt-free!
Share Your Perfectly Baked Sweet Potato Results
Whew! That’s really it! You’ve mastered the foolproof technique for baked sweet potatoes that are genuinely fluffy inside and nicely crisp on the outside, no foil needed. I really hope you love how simple this method is and how incredible these turn out. They transform from being just a vegetable to being the star of the plate!
Now that you’ve tasted the difference a direct-rack bake makes, I’d absolutely love to hear what you thought! Did you stick to the simple salt and pepper, or did you decide to go wild with toppings? Were you shocked by how crispy the skin got without foil?
Please take a moment and leave me a quick star rating right below this section. That feedback truly helps other home cooks know that they can trust this method too. If you dressed yours up with something amazing—maybe a savory topping or a gourmet veggie side dressing—snap a picture and tag us on social media! I love seeing your creations and finding new ways to serve up these amazing potatoes. Or if you ran into any snags, don’t hesitate to shoot me a message using the contact page; I’m always happy to troubleshoot!
Thanks for cooking with me. I can’t wait to see how you enjoy your perfectly cooked sweet potatoes!
PrintFoolproof Perfectly Baked Whole Sweet Potatoes (Fluffy Inside, Crispy Skin)

Learn the simple, no-foil method to bake whole sweet potatoes until they have fluffy interiors and crispy skins. This technique guarantees tender results every time you make this healthy side dish.
- Prep Time: 5 min
- Cook Time: 50 min
- Total Time: 55 min
- Yield: 4 servings 1x
- Category: Side Dish
- Method: Baking
- Cuisine: American
- Diet: Vegetarian
Ingredients
- 4 medium sweet potatoes, scrubbed clean
- 1 tablespoon olive oil
- 1 teaspoon coarse salt
- 1/2 teaspoon black pepper
Instructions
- Preheat your oven to 400 degrees Fahrenheit (200 degrees Celsius).
- Prick each sweet potato several times deeply all over using a fork. This allows steam to escape.
- Rub the exterior of each potato lightly with olive oil.
- Sprinkle the potatoes evenly with coarse salt and black pepper.
- Place the seasoned potatoes directly onto the middle oven rack. Do not use foil.
- Bake for 45 to 60 minutes, depending on the size of the potatoes. Smaller potatoes may take 45 minutes; larger ones may take the full 60 minutes.
- Check for doneness by squeezing gently; the potato should yield easily. The skin should look slightly wrinkled and crisp.
- Remove from the oven. Slice open the top lengthwise and gently squeeze the sides to fluff the interior flesh.
- Serve immediately with your favorite toppings.
Notes
- For extra flavor, rub the potatoes with a small amount of coconut oil instead of olive oil before seasoning.
- If you prefer a sweeter flavor profile, serve with a topping of cinnamon butter or a drizzle of maple syrup.
- For meal prep, bake the potatoes ahead of time and store them whole in the refrigerator for up to four days. Reheat in the oven or microwave.
- If you want a twice-baked preparation, scoop out the flesh after baking, mix with desired fillings, and return to the skins to bake for 10 more minutes.
Nutrition
- Serving Size: 1 potato
- Calories: 180
- Sugar: 13
- Sodium: 150
- Fat: 0.5
- Saturated Fat: 0.1
- Unsaturated Fat: 0.4
- Trans Fat: 0
- Carbohydrates: 41
- Fiber: 7
- Protein: 4
- Cholesterol: 0