Easy No-Bake Red Velvet Cake Balls with Cream Cheese Frosting
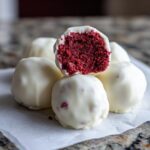
Make these simple, bite-sized red velvet cake balls using a boxed cake mix and cream cheese frosting. They require no baking and are coated in smooth chocolate for a perfect party dessert.
- Prep Time: 25 min
- Cook Time: 30 min
- Total Time: 1 hour 55 min
- Yield: 24 servings 1x
- Category: Dessert
- Method: No Bake (after initial cake baking)
- Cuisine: American
- Diet: Vegetarian
Ingredients
Scale
- 1 box (15.25 oz) red velvet cake mix
- 1 container (16 oz) cream cheese frosting (store-bought is fine)
- 12 oz white chocolate melting wafers or chips
- 1 tablespoon vegetable shortening (optional, for smoother coating)
- Red sprinkles or decorative drizzle (optional)
Instructions
- Prepare the red velvet cake according to the package directions, but use the ingredients listed on the box for a standard 9×13 inch cake. Bake the cake completely.
- Let the baked cake cool completely on a wire rack.
- Once cool, crumble the entire cake into fine crumbs into a large bowl. You can use your hands or a food processor for this step.
- Add the entire container of cream cheese frosting to the cake crumbs. Mix thoroughly until a thick, uniform dough forms.
- Roll the dough into small, uniform balls, about 1 inch in diameter. Place the rolled balls on a baking sheet lined with parchment paper.
- Chill the cake balls in the refrigerator for at least 30 minutes. This step helps them firm up before dipping.
- Melt the white chocolate wafers according to package directions. If using shortening, stir it into the melted chocolate for a thinner consistency.
- Dip each chilled cake ball into the melted chocolate, ensuring it is fully coated. You can use a dipping tool or two forks. Gently tap the fork on the side of the bowl to allow excess chocolate to drip off.
- Place the coated balls back onto the parchment-lined baking sheet.
- If desired, immediately add red sprinkles or drizzle with extra melted chocolate before the coating sets.
- Allow the chocolate coating to set completely at room temperature, or speed up the process by chilling them for another 10-15 minutes.
Notes
- For a richer flavor, you can use homemade cream cheese frosting instead of store-bought.
- If you want a darker red color, add 1 teaspoon of red gel food coloring to the cake batter before baking.
- These **homemade cake truffles** freeze well. Store them in an airtight container in the freezer for up to three months.
Nutrition
- Serving Size: 1 ball
- Calories: 220
- Sugar: 22
- Sodium: 150
- Fat: 14
- Saturated Fat: 8
- Unsaturated Fat: 6
- Trans Fat: 0.5
- Carbohydrates: 23
- Fiber: 0.5
- Protein: 2
- Cholesterol: 25