
Oh, you know those weekends where you just need something truly indulgent? Forget the regular breakfast routine! I live for those lazy mornings when I can pull flour, butter, and a whole bottle of red dye out of the cupboard and settle in for some serious baking. That’s where these bakery-style, soft, fluffy red velvet cinnamon rolls come into play. After years in my own kitchen developing recipes that actually work every single time—no guesswork, promise!—I finally perfected the balance between that classic, slightly tangy red velvet flavor and that warm cinnamon spice. And the cream cheese glaze? It’s so rich and perfect, it puts every store-bought version to shame. Trust me; these rolls are worth every single minute!
If you love a good holiday bake but prefer something a little less expected than a traditional cinnamon roll, this variation is going to be your new best friend. Unlike many recipes online that promise fluffiness but deliver disappointment, I tested these rolls until the dough was absolutely foolproof. They are fantastic on their own, but you can check out my tried-and-true recipe for amazing cream cheese frosting if you want to see more of my topping secrets!
- Why You Will Make These Red Velvet Cinnamon Rolls Again and Again
- Gathering Ingredients for Fluffy Red Velvet Cinnamon Rolls
- Expert Tips for the Softest Cinnamon Rolls Ever Dough
- Step-by-Step Instructions for Bakery Style Red Velvet Rolls
- Making the Cream Cheese Glaze Rolls Topping
- Serving and Storing Your Homemade Red Velvet Sweet Rolls
- Troubleshooting Common Red Velvet Cinnamon Rolls Issues
- Frequently Asked Questions About Red Velvet Baking
- Estimated Nutritional Breakdown for Red Velvet Cinnamon Rolls
- Share Your Red Velvet Swirl Dessert Buns Experience
Why You Will Make These Red Velvet Cinnamon Rolls Again and Again
Honestly, you’ll keep coming back to this recipe because the results are just unmatched. We aren’t messing around with dry bread here; we’re aiming for that bakery-quality experience right in your own kitchen. It’s all about the payoff!
- They achieve that true, pillowy, soft texture every time—seriously the softest cinnamon rolls ever.
- The flavor is that perfect marriage of classic red velvet cocoa notes mixed with warm cinnamon spice.
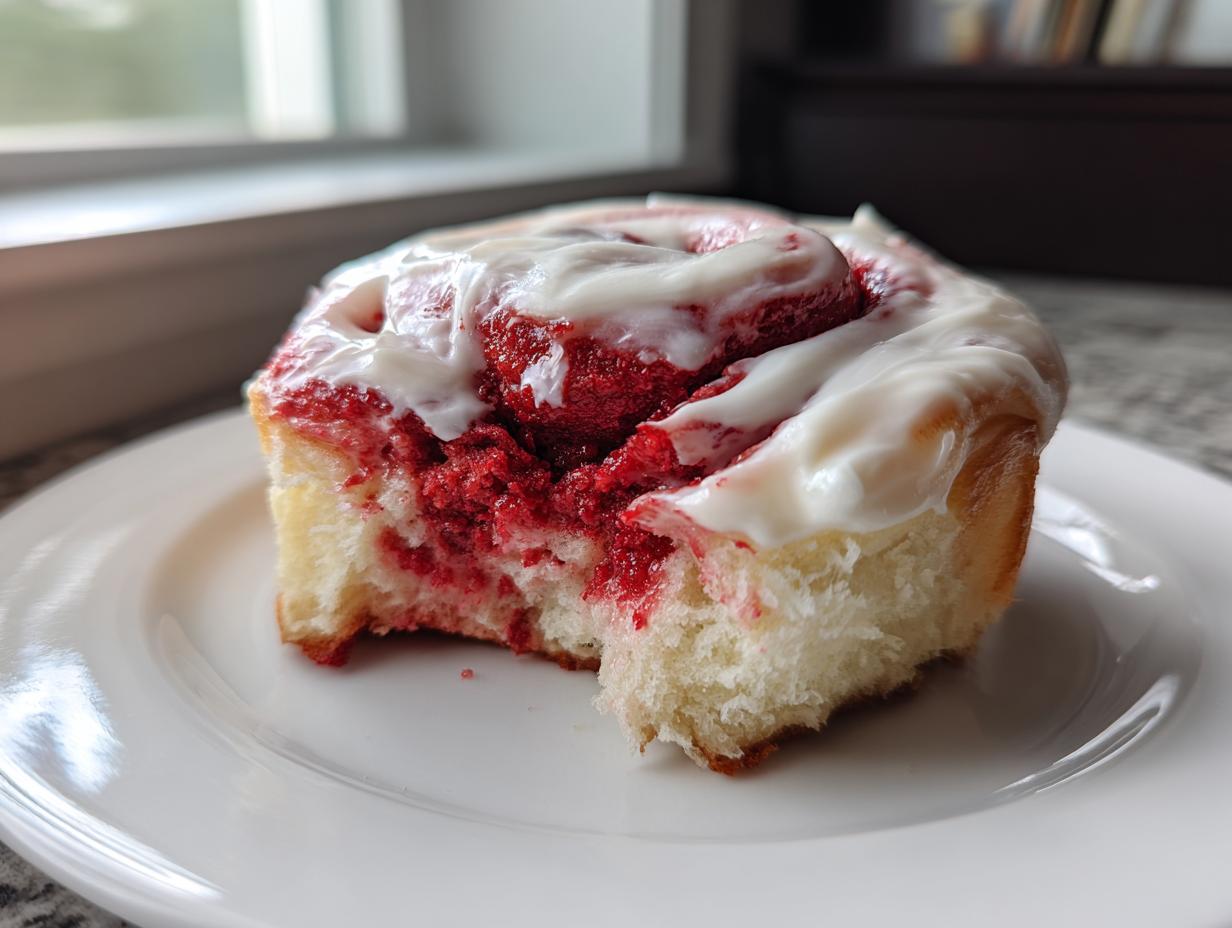
- They are showstoppers visually—perfect for setting the scene for Valentine’s Day brunch or elevating your Christmas Morning Cinnamon Rolls.
- The tangy cream cheese icing makes them utterly irresistible.
The visual impact alone makes them perfect for any of your indulgent brunch ideas!
Gathering Ingredients for Fluffy Red Velvet Cinnamon Rolls
Okay, since these are going to be extra special, we need to make sure we have everything ready before we even think about turning the mixer on. When I test these red velvet cinnamon rolls, I lay everything out so I can move fast once the yeast gets happy. Using room-temperature ingredients, especially the egg, really helps everything emulsify beautifully.
For the dough itself, don’t skimp on the milk temperature—we need it warm, about 110°F, to wake up that yeast. And listen, for the color to really pop, I really, truly suggest skipping the liquid dye if you can and opting for a concentrated red gel paste. It gives you that deep, gorgeous color without adding extra liquid that can throw off our dough balance. By the way, if you need a standalone masterclass on icing, my super-detailed ultimate cream cheese frosting recipe is a great bookmark for later!
Here’s what you’ll need to gather:
For the Velvet Dough:
- 1 cup warm milk (about 110°F—just a little hotter than warm bath water!)
- 2 1/4 teaspoons active dry yeast
- 1/2 cup granulated sugar, divided
- 1 large egg, room temperature
- 1/4 cup unsalted butter, melted
- 1 teaspoon vanilla extract
- 1/2 teaspoon salt
- 3 to 3 1/2 cups all-purpose flour, plus more for dusting (we might not need all of that last bit!)
- 2 tablespoons red food coloring (ideally gel paste for the deepest color)
- 1 tablespoon cocoa powder (the regular unsweetened kind works great)
- 1 teaspoon white vinegar
- 1/2 teaspoon baking soda
For the Cinnamon Filling:
- 1/2 cup unsalted butter, softened just until it squishes easily
- 3/4 cup packed light brown sugar (pack it in there!)
- 2 teaspoons ground cinnamon
For the Essential Cream Cheese Icing:
- 8 ounces cream cheese, softened until very spreadable
- 1/2 cup unsalted butter, softened
- 3 cups powdered sugar, sifted (sifting is non-negotiable here, trust me!)
- 1 teaspoon vanilla extract
- 1-2 tablespoons milk or heavy cream (just to get that perfect drizzle consistency)
Having these components ready makes the actual process of assembling these Velvet Dough Rolls Recipe rolls so much more relaxing!
Expert Tips for the Softest Cinnamon Rolls Ever Dough
Look, we need these red velvet cinnamon rolls to be soft, right? It all starts before you even add the flour. Tip number one: Yeast temperature is everything. If your milk is too hot, you kill the yeast, and then you’re stuck with flat, sad dough. It should feel barely warm, like a baby’s bathwater—aim right around 110°F. My second big secret for getting the softest cinnamon rolls ever comes during the kneading process.
Don’t just dump all the flour in at once! We want a supple, slightly tacky dough, not a tough baseball. Knead until it’s just right; you want it soft enough to hug, not fight! If you want more dough wisdom, I talk all about achieving that cloud-like texture in my guide on soft homemade dinner rolls.
Achieving the Perfect Red Velvet Swirl Buns Color
This is where we get that gorgeous, vibrant look that screams ‘special occasion.’ If you use standard liquid food coloring, you often have to add so much that it actually changes the dough’s texture, making it a little dense or sticky. Don’t do that to yourself!
Instead, invest in a good quality red gel paste—it has way more pigment. A tiny little toothpick-tip amount gives you deep, rich color without messing with the hydration levels we worked so hard to get perfect. That’s how you guarantee those beautiful Red Velvet Swirl Buns pop against the white icing later on. It shows you pay attention to the details!
Step-by-Step Instructions for Bakery Style Red Velvet Rolls
Alright, now that our foundational dough is soft and vibrant, it’s time for the magic to happen! Remember, patience during the resting phases is what guarantees those bakery style red velvet rolls are light and dreamy. First, after your dough has doubled (that takes about 1 to 1.5 hours, depending on how warm your kitchen is), gently punch it down. We don’t want to knock out *all* that wonderful air we just worked to create!
Roll that beautiful red dough out on a lightly floured surface into that classic 12×18 inch rectangle. Now, take that beautiful cinnamon-butter filling we made earlier and spread it around evenly. Make sure you leave about a half-inch border along one of the long sides—that’s your sealing strip, so don’t cover that edge!
We need to roll this up tightly! Starting on the opposite side, roll it firm, like you are rolling up a yoga mat. Pinch that seam closed really well if you need to. This log is going to deliver those gorgeous swirls! Next, cut the log into 12 equal pieces. I always recommend using unflavored dental floss for this—it slices right through without squishing your beautiful work like a knife sometimes does. Just slide the floss under the log and cross the ends over the top.
Pop those red velvet cinnamon rolls into your greased 9×13 baking dish. Cover them loosely and let them puff up again for about 30 to 45 minutes. This second rise is critical for that final fluffiness. Once they look puffy and happy, bake at 375°F (190°C) for just 20 to 25 minutes until they are set. If you’re looking for other comforting weekend bakes, you absolutely have to check out my guide on making cinnamon roll casserole!
Rolling and Cutting Your Red Velvet Cinnamon Rolls
When you roll that dough, imagine you are trying to contain the biggest cinnamon flavor explosion ever—so keep it tight! If you have loose ends, the rolls will bake unevenly, and you’ll get gaps instead of those perfect stripes. Pinch that seam closed securely so it doesn’t unravel halfway through baking. I know it seems fussy, but a tight log equals perfect spirals.
For cutting, I swear by dental floss. It minimizes drag and keeps the sides of your rolls from getting mangled. Just use a clean piece, slide it under the bottom center of your log, bring the ends up over the top, and gently pull them tight until they slice through. They should be about 1 to 1.5 inches wide. Arrange them snuggly in your prepared pan, making sure they are close because they will expand while they bake. This method helps them support each other and stay tall and moist, just like the ones you see on those gorgeous posts, like this stunning example from Savoring Moments!
Making the Cream Cheese Glaze Rolls Topping
This is it—the crowning glory! Honestly, the right amount of thick, tangy icing is what really separates a good cinnamon roll from an absolutely show-stopping one, especially when we are talking about these vibrant red velvet cinnamon rolls. You want this topping to be luxurious, but also stable enough to sit nicely on top without just melting away into a puddle.
First things first, make sure your cream cheese and butter are properly (and I mean *properly*) softened. Cold fat means lumpy icing, and we absolutely cannot have lumps in our dessert!
Beat those two together until they are completely smooth. Then, start bringing in the powdered sugar slowly. If you dump it all in at once, you’ll end up with a snowstorm in your kitchen, and that’s just messy! Mix on low until it’s incorporated, then you can speed it up a bit. The vanilla goes in, too, right about now to boost that flavor.
Now, for consistency: we are aiming for that perfect, thick, spreadable consistency—the kind that holds its shape but still melts beautifully when it hits the warm pastry. This is where that milk or cream comes in handy. Add it one tablespoon at a time. You might only need one tablespoon, or you might need two, depending on how humid your kitchen is that day. Keep mixing and scraping down those sides until it looks thick enough to coat the back of a spoon nicely. If it looks too thick, splash in a tiny bit more cream; if it looks too runny, mix in a tablespoon of extra powdered sugar. It’s that easy to control the thickness of these Cream Cheese Glaze Rolls!
If you want to see how I achieve similar stability in a different context, my guide on making stable vanilla buttercream also walks through the technique of adding liquid slowly to ensure perfect consistency every time. Once the rolls have cooled for just a few minutes—they should still be warm, not piping hot—slather that creamy topping over liberally. Watching it melt slightly into the crevices is pure joy!
Serving and Storing Your Homemade Red Velvet Sweet Rolls
This is often the hardest part: waiting! But trust me, knowing how to time the glazing is key to getting that perfect gooey texture. You want to apply that luscious cream cheese icing when the red velvet cinnamon rolls are still warm—not scalding hot, but warm enough that the icing softens just slightly and sinks into all those beautiful cinnamon crevices. If you wait until they are stone cold, the icing just sits on top like stiff frosting. That’s fine for a cupcake, but for these, warm is best!
Now, let’s talk about the inevitable leftovers, though I sincerely doubt you’ll have many! These rolls are so soft that they truly are best the day you bake them. To keep them fresh for the next day, pop them into an airtight container at room temperature. They’ll usually hold up beautifully for about two days that way. If things start to look a little sad on Day Three, you can always refresh them! Pop a single roll in the microwave for about 10 to 15 seconds. It brings back that just-out-of-the-oven softness. If you need to keep them longer, freezing is your friend!
For freezing, the best time to freeze is before baking, based on what I learned while testing these recipes for quick breakfast treats. If you’ve already cut the rolls, place them snugly in your baking dish, cover the entire thing tightly with plastic wrap, and then wrap it again in foil before popping it in the freezer for up to three months. When you want them, just transfer the dish (still covered!) to the fridge overnight to thaw. Then, let them rest on the counter for about an hour, remove the plastic wrap, re-cover loosely with foil, and bake as directed, adding about 10 extra minutes to the bake time since they are starting cold. It’s a great trick for easy serving later!
If you’ve already baked them, let them cool completely first, then freeze them unwrapped on a baking sheet until solid. Once frozen, transfer them layered between sheets of wax paper into a freezer-safe bag. If you’re looking for other make-ahead solutions for busy mornings, my tips on making breakfast ahead of time are fantastic guides for restocking your freezer!
If you’re looking for more simple baking hacks that save time, check out how easy it is to use shortcuts sometimes, like the method detailed in this easy red velvet cinnamon rolls recipe—sometimes a little shortcut just gets the job done without sacrificing too much flavor!
Troubleshooting Common Red Velvet Cinnamon Rolls Issues
Even when following recipes perfectly, sometimes the dough pulls a fast one on you! Don’t panic if things aren’t going exactly as planned. I’ve run into almost every catastrophe possible while testing, so I know what to look for when something seems off. Troubleshooting is part of the experience, especially when dealing with enriched doughs like these.
The easiest issue to solve? If your dough just isn’t rising, it’s almost always the yeast or the temperature. Did your milk feel hot when you added the yeast? If yes, you shocked the little guys, and they won’t bubble up. If that happens, you have to start over. If your kitchen is just chilly, try letting the dough rise in your oven with just the light turned on—that trapped warmth works wonders for getting those red velvet cinnamon rolls puffed up and beautiful.
If your rolls come out a little dry, it probably happened during the rolling phase. Did you spread the filling all the way to the edges, or did you leave too much dough uncovered? That exposed dough bakes up like a cracker! Next time, make sure your filling goes right to the edge so the rolls seal in moisture. Alternatively, if you baked them too long, they will dry out fast. For future baking sessions planned for indulgent brunch ideas, remember to check them a few minutes early!
Now, let’s talk icing disasters, because we all make them. If your Cream Cheese Glaze Rolls icing seems watery and keeps running off the sides, you added too much milk or cream. You can fix this instantly by whisking in a quarter cup of powdered sugar at a time until it thickens up to a nice, gooey ribbon stage. If you accidentally made it rock hard—maybe you put the frosting in the fridge too fast—just let it sit on the counter for an hour, and then beat it again, adding just a teaspoon of milk to soften it up. It’s all fixable, I promise!
Frequently Asked Questions About Red Velvet Baking
I get so many emails asking about the finer points of making these—it just goes to show how much love there is out there for a good, decadent pastry! Here are the top questions I hear about whipping up these beauties, especially when people are planning for big weekend breakfasts or setting up their Christmas Morning Cinnamon Rolls spread.
Can I just use a box of red velvet cake mix instead of making the dough from scratch?
You absolutely *can*! If you’re short on time and need an amazing shortcut toward great Red Velvet Dessert Recipes, mixing up a box of red velvet cake mix and following the substitution instructions can absolutely work. However, I have to be honest: the texture won’t be *quite* as cloud-like as the scratch dough. The homemade yeast dough we use here creates those airy pockets that make them truly bakery style red velvet rolls. Box mixes often yield an okay bun, but the homemade version is worth the initial effort for the fluff factor!
Why does the recipe call for vinegar and baking soda in the dough?
That’s the key to the classic red velvet tang! Those two ingredients—the white vinegar and the baking soda—are reacting together in the dough. They create the necessary acid reaction to help the dough rise beautifully, especially because we use cocoa powder, which is naturally alkaline. Skipping them usually means sacrificing some of that beautiful lift and the subtle, required tang that defines what red velvet actually is. It’s a baking science moment that makes these Sweet Breakfast Treats special!
Can I make these ahead of time for a holiday brunch?
Yes, and this is my favorite way to handle large gatherings! You can definitely prepare all the steps right up until the cutting stage. After you cut the log into your 12 rolls, place them snugly in the baking dish, cover them tightly, and tuck them into the refrigerator overnight. This is an excellent trick for relaxing starters! When you wake up on the big day, pull them out onto the counter while your coffee brews, let them sit for about an hour to come slightly closer to room temperature, and then bake them. Since they start cold, you just need to add about 10 minutes to the baking time. For more great holiday planning, I’ve got some fantastic advice over on my Christmas breakfast casserole guide that might help plan your menu!
What if I want a thinner glaze for a drizzled look rather than a thick spread?
That’s an easy fix for achieving that delicate, drizzled look, perfect for when you want something a little less overwhelming than a thick layer of icing. To thin out your Cream Cheese Glaze Rolls topping, simply beat in extra milk or heavy cream, one teaspoon at a time, until the icing flows off your whisk instead of holding its shape. This is especially great if you want to serve these Homemade Red Velvet Sweet Rolls slightly later in the day when you prefer a lighter touch. If you want to see how professional bakers achieve super thin glazes, check out this piece on easy red velvet baking!
Estimated Nutritional Breakdown for Red Velvet Cinnamon Rolls
Look, I tried to keep these red velvet cinnamon rolls as indulgent as possible, because that’s the point of a weekend bake, right? When you’re asking for something truly decadent, the numbers are going to reflect that buttery goodness and that glorious cream cheese icing! I pulled these estimates together based on the ingredient amounts listed in the main recipe, but I always want to give you a heads-up.
Since we are working with real butter, fresh cream cheese, and sugar that is packed into that gooey filling, these end up firmly in the “special treat” category—totally worth it for a brunch centerpiece or a holiday morning!
Here is a general estimation for one single roll:
- Serving Size: 1 roll
- Calories: 550
- Fat: 30g (Be sure to note that a good chunk of this is coming from the good stuff—the butter!)
- Saturated Fat: 18g
- Trans Fat: 0.5g
- Cholesterol: 75mg
- Carbohydrates: 68g
- Sugar: 55g (Yes, it’s high, but hello, this is dessert masquerading as breakfast!)
- Fiber: 2g
- Protein: 7g
- Sodium: 450mg
Now, please treat these figures as a guideline, not a hard science fact! If you decide to use lighter cream cheese or substitute some of the sugar, the final count will change. The exact values really depend on the specific brands of flour, butter, and cream cheese you bring into your kitchen. But for planning purposes, especially if you are tracking for Sweet Breakfast Treats, you have a solid ballpark figure here!
Share Your Red Velvet Swirl Dessert Buns Experience
I’ve given you every trick I know for making these red velvet cinnamon rolls come out soft, fluffy, and spectacularly red. Now, the kitchen is officially yours! I truly can’t wait to see how your baking turned out. Did you manage to get that perfect, glossy spread on your cream cheese icing? Did you add extra spice to the filling, or maybe even a tiny splash of espresso to the dough like I sometimes do?
Please, don’t be shy! Head down to the comments section right now and leave a star rating for this recipe. That feedback really helps other home cooks feel confident trying this bake. If you made any modifications—maybe you tried using almond extract instead of vanilla, or perhaps you found an even better way to incorporate those luxurious textures—let us know! Sharing our kitchen wins and little adjustments is what this community is all about.
And if you managed to snap a picture of those gorgeous, perfectly iced Red Swirl Dessert Buns before everyone devoured them, please share them on social media! Tag me so I can see your beautiful work. Seriously, seeing your gorgeous final product is honestly the best part of developing recipes for me. If you are looking for more inspiration for those wonderful Sweet Breakfast Treats, you can always browse all my tried-and-true recommendations over on my page for quick and easy breakfasts!
Once you’ve left your thoughts, you might want to check out some of the other incredible holiday bakes others are trying, like the gorgeous version featured on Tasty Formula. Happy baking, friends—I hope these rolls bring the same joy to your table that they bring to mine!
PrintSoft and Fluffy Red Velvet Cinnamon Rolls with Cream Cheese Icing

Make bakery-style red velvet cinnamon rolls that are soft, fluffy, and bursting with classic red velvet flavor and cinnamon spice. This recipe includes clear steps for a rich cream cheese glaze.
- Prep Time: 45 min
- Cook Time: 25 min
- Total Time: 145 min
- Yield: 12 servings 1x
- Category: Breakfast
- Method: Baking
- Cuisine: American
- Diet: Vegetarian
Ingredients
- 1 cup warm milk (about 110°F)
- 2 1/4 teaspoons active dry yeast
- 1/2 cup granulated sugar, divided
- 1 large egg, room temperature
- 1/4 cup unsalted butter, melted
- 1 teaspoon vanilla extract
- 1/2 teaspoon salt
- 3 to 3 1/2 cups all-purpose flour, plus more for dusting
- 2 tablespoons red food coloring (or gel paste for deeper color)
- 1 tablespoon cocoa powder
- 1 teaspoon white vinegar
- 1/2 teaspoon baking soda
- For the Filling:
- 1/2 cup unsalted butter, softened
- 3/4 cup packed light brown sugar
- 2 teaspoons ground cinnamon
- For the Cream Cheese Icing:
- 8 ounces cream cheese, softened
- 1/2 cup unsalted butter, softened
- 3 cups powdered sugar, sifted
- 1 teaspoon vanilla extract
- 1–2 tablespoons milk or heavy cream
Instructions
- Activate the yeast: In a large bowl, combine the warm milk, yeast, and 1 tablespoon of the granulated sugar. Let stand for 5 to 10 minutes until foamy.
- Mix wet ingredients: Add the remaining granulated sugar, egg, melted butter, and vanilla extract to the yeast mixture. Stir to combine.
- Combine dry ingredients: In a separate bowl, whisk together 3 cups of flour and salt. Gradually add the dry ingredients to the wet ingredients, mixing until a shaggy dough forms.
- Add red velvet elements: In a small bowl, mix the red food coloring, cocoa powder, vinegar, and baking soda until combined. Add this mixture to the dough and mix until the color is evenly distributed.
- Knead the dough: Turn the dough out onto a lightly floured surface. Knead for 6 to 8 minutes, adding small amounts of the remaining flour only if the dough is too sticky. The dough should be soft and slightly tacky.
- First rise: Place the dough in a lightly oiled bowl, turning to coat. Cover the bowl with plastic wrap and let it rise in a warm place for 1 to 1.5 hours, or until doubled in size.
- Prepare the filling: While the dough rises, beat the softened butter, brown sugar, and cinnamon together until smooth and well combined. Set aside.
- Shape the rolls: Gently punch down the risen dough. Roll it out on a lightly floured surface into a large rectangle, about 12×18 inches.
- Spread the filling: Evenly spread the cinnamon-brown sugar filling over the entire surface of the dough, leaving a small border on one long edge.
- Roll and cut: Starting from the long edge opposite the border, tightly roll the dough into a log. Pinch the seam closed. Cut the log into 12 equal rolls using a sharp knife or unflavored dental floss.
- Second rise: Arrange the rolls in a greased 9×13 inch baking dish. Cover loosely and let them rise again for 30 to 45 minutes until puffy.
- Bake the rolls: Preheat your oven to 375°F (190°C). Bake for 20 to 25 minutes, or until the centers are set and the edges are lightly golden.
- Make the icing: While the rolls cool slightly, beat the softened cream cheese and butter together until smooth. Gradually beat in the sifted powdered sugar and vanilla extract. Add milk or cream one tablespoon at a time until you reach a thick, spreadable consistency.
- Glaze and serve: Spread the cream cheese icing generously over the warm rolls. Serve immediately for the softest texture.
Notes
- For a deeper red color, use red gel food coloring instead of liquid dye.
- If you prefer a shortcut, you can use a box of red velvet cake mix to create the dough base, substituting the dry ingredients as directed in the secondary search results.
- To achieve bakery-style fluffiness, make sure your milk is warm enough to activate the yeast but not hot enough to kill it.
- If you are making these ahead of time, cover the unbaked rolls and refrigerate for up to 12 hours. Add 5-10 minutes to the final bake time if baking directly from the refrigerator.
Nutrition
- Serving Size: 1 roll
- Calories: 550
- Sugar: 55
- Sodium: 450
- Fat: 30
- Saturated Fat: 18
- Unsaturated Fat: 12
- Trans Fat: 0.5
- Carbohydrates: 68
- Fiber: 2
- Protein: 7
- Cholesterol: 75