
Oh, you gorgeous chocolate fiend, I hear you calling! When that deep, dark craving hits, nothing short of pure, unadulterated fudge will do. Forget those watery custard pies; we’re making something incredible today. This is my ultimate rich and gooey classic chocolate fudge pie recipe, designed specifically to deliver that intense chocolate flavor you’re dreaming about. Because I’ve spent years testing recipes rigorously in professional kitchens, I can guarantee you this version is foolproof—it sets beautifully, it’s simple to make from scratch, and it delivers maximum decadence every single time. Trust me, you’ll want to see my recipe for fudgy brownies next!
- Why This is the Best Chocolate Fudge Pie Recipe You Will Make
- Ingredients for Your Easy Homemade Fudge Pie
- How to Make Chocolate Fudge Pie: Step-by-Step Instructions
- Tips for Achieving the Perfect Fudgy Dessert Recipes for Holidays
- Ingredient Notes and Simple Substitutions for this Chocolate Fudge Pie
- Serving Suggestions for Your Decadent Dark Chocolate Pie
- Storage and Reheating Instructions for Classic Chocolate Pie Baking
- Frequently Asked Questions about Making Chocolate Fudge Pie
- Estimated Nutritional Information for This Rich Chocolate Dessert Recipe
Why This is the Best Chocolate Fudge Pie Recipe You Will Make
Honestly, if you’re going to go through the trouble of making a pie, it better be worth it. This chocolate fudge pie is absolutely worth it! Based on my professional testing, what makes this recipe shine is the incredible guarantee of texture and flavor.
- You get that intensely dark, almost grown-up chocolate taste.
- The filling is perfectly creamy—it’s gooey when warm but sets up beautifully when chilled.
- It’s surprisingly reliable, even if you’re new to making things from scratch.
If you love this level of chocolate goodness, you have to try my recipe for the best chocolate crinkle cookies next!
Ingredients for Your Easy Homemade Fudge Pie
This is where the magic starts, and since we want this to be an easy homemade fudge pie, I’ve kept the sourcing straightforward. You’ll notice that we use chocolate sandwich cookies—my favorite way to get that perfect press-in crust, saving us loads of time! Don’t worry if you don’t have a scale; just make sure you fill those measuring cups correctly. Precision here really helps ensure we get that creamy fudge pie filling setting up just right.
Here is exactly what you need for the crust and the decadent dark chocolate pie filling:
- 1 1/2 cups crushed chocolate sandwich cookies (like Oreos – crushing them finely is key!)
- 6 tablespoons unsalted butter, melted (make sure to use real butter, please!)
And for that deep, rich filling:
- 1 cup granulated sugar
- 1/2 cup unsweetened cocoa powder
- 1/4 teaspoon salt
- 1/2 cup heavy cream
- 1/4 cup milk (I use whole milk for the best richness)
- 2 large eggs (they need to be room temperature for tempering!)
- 1 teaspoon vanilla extract
- 4 ounces bittersweet chocolate, chopped (this is where the intense flavor comes from!)
This list is your roadmap to one of the best chocolate desserts you’ll ever make. If you want to see another great, simple chocolate bake using accessible ingredients, check out my recipe for moist chocolate banana bread!
How to Make Chocolate Fudge Pie: Step-by-Step Instructions
Okay, let’s get down to business and make this incredible chocolate fudge pie. I promise this looks more complicated than it is. Since I’ve had years of practice making sure everything sets up perfectly, I’m going to walk you through the couple of spots where you really need to pay attention, especially when handling those eggs!
Preparing the Cookie Crust and Preheating
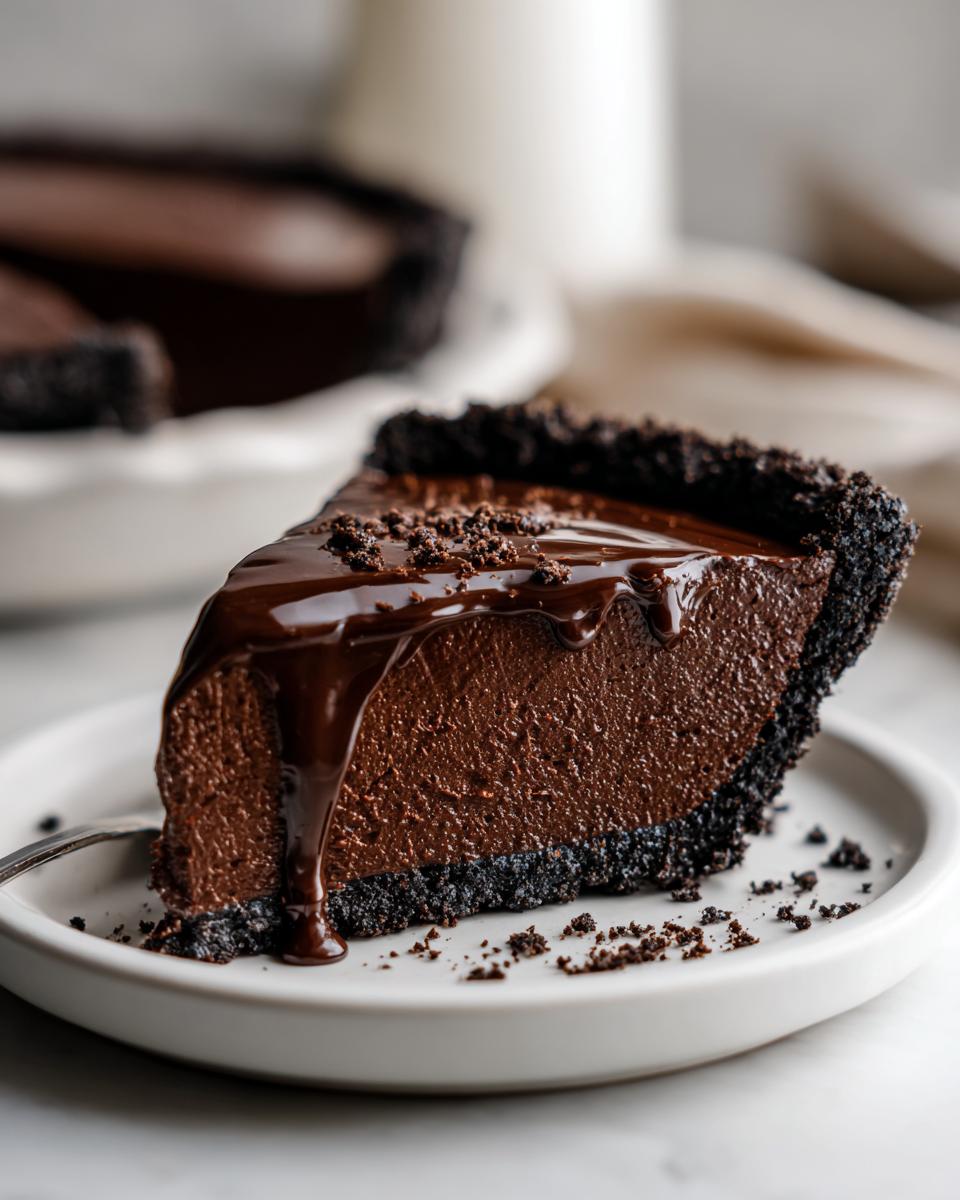
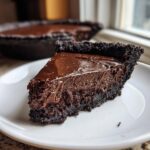
First things first: get that oven warmed up to 350 degrees Fahrenheit. Grab your 9-inch pie plate. In a bowl, mix up your crushed cookies and melted butter until it looks like wet sand. Press this mixture firmly—and I mean *firmly*—into the bottom and up the sides of your plate. Pop that crust into the oven for exactly 8 minutes. It just needs to set up a bit. Then, let it cool while we whip up the gooey star of the show.
Creating the Creamy Fudge Pie Filling Base
Grab a medium saucepan, and in goes your sugar, cocoa powder, and salt. Whisk those dry things together first so you don’t get lumps later. Now, slowly whisk in your heavy cream and milk until it looks smooth. Set this over medium heat and stir constantly! We’re looking for it to thicken just a bit and start bubbling at the edges—this usually takes about 5 to 7 minutes. As soon as you see something happening, pull it right off the heat.
Tempering Eggs and Final Cook for Rich Chocolate Dessert Recipes
This is the step that separates a good pie from a great one! In a separate small bowl, whisk your two eggs lightly. You MUST temper them to avoid scrambling them when you add them to the hot mixture. Slowly pour about half a cup of that hot chocolate base into the eggs while whisking like mad! Once they are warmed up, gently pour that egg mixture back into the saucepan with the rest of the chocolate. Return it to very low heat and stir for just one minute. Do NOT let it boil, or you’ll mess up the texture for these rich chocolate dessert recipes.
Baking and Chilling the Chocolate Fudge Pie
Take the pan off the heat and toss in your chopped bittersweet chocolate and vanilla until everything melts into one smooth, gorgeous filling. Pour this luxurious mixture right into your cooled crust. Bake it for about 20 to 25 minutes. Here’s the key: the edges should look set, but the very center should still have a tiny wobble. Don’t overbake! Trust me on this one. After it comes out, let it cool completely on the counter for at least two hours, and then—this is non-negotiable—chill it in the fridge for another two hours. That chilling time makes your pie fudgy instead of soupy!
If you’re looking for another fantastic dessert to serve alongside your pie, you simply have to check out my recipe for chocolate salted caramel cake!
Tips for Achieving the Perfect Fudgy Dessert Recipes for Holidays
Listen, getting that perfect texture in your chocolate fudge pie is all about stopping points and quality ingredients. The number one mistake people make is overbaking. If you pull it out when the center still jiggles slightly—like Jell-O, not liquid water!—it will set up perfectly as it cools. If you bake it until it’s totally solid, you end up with a firm chocolate brick, not a gooey treat.
For that intense chocolate pie flavor we talked about, don’t skimp on the quality of your chocolate bar. Bittersweet (around 60-70% cacao) is my go-to because it keeps the sweetness balanced. If your pie seems too runny after cooling, it probably needed just a little more cooking time on the stovetop before tempering, or perhaps you went too light on the chocolate.
If you love decadent pies, you must also try my recipe for a Texas gooey chocolate pecan pie!
Ingredient Notes and Simple Substitutions for this Chocolate Fudge Pie
It’s important to know that while this is my tried-and-true chocolate fudge pie recipe, I know life sometimes means you’re missing one little thing. Good news: this recipe is quite forgiving, especially since the chocolate does most of the heavy lifting! My main goal here is to maintain that incredible texture and deep chocolate flavor we worked so hard to build.
If you look at the original notes, you’ll see I suggested using bittersweet chocolate for that amazing, intense flavor. That’s my personal preference because it cuts through the sugar perfectly. But listen, if you only have semi-sweet chocolate on hand, go ahead and swap it! It will make the final result a touch sweeter, but it will still be deliciously fudgy.
Now, here is one of my favorite little tricks that I learned back when I was testing recipes for clients who needed things done quickly—ingredient temperature matters! For the eggs, while I call for room temperature, if you forget, just place the whole egg (still in the shell!) in a bowl of very warm—not hot—water for about five minutes. This small temperature boost prevents shocking the eggs when you introduce them to that hot dairy mixture during the tempering step. It just helps everything blend smoother, which means a better creamy fudge pie filling!
For those who are curious about the crust, the recipe calls for chocolate sandwich cookies, but you can absolutely use a plain graham cracker crust if you like a textural contrast. If you go that route, you might want to add a teaspoon or two of cocoa powder to the graham cracker and butter mix before pressing it in. It makes a wonderful base for any pie, just like the icing I use on my favorite sugar cookies!
Serving Suggestions for Your Decadent Dark Chocolate Pie
You’ve done the hard part by making this incredible decadent dark chocolate pie! Now, we get to the fun part: making it look as amazing as it tastes. Presentation is everything when you serve a truly rich chocolate dessert; it just elevates the whole experience.
The original notes mentioned a simple dusting of cocoa powder, and honestly, that’s a professional move. Just grab a fine-mesh sieve and dust the top lightly right before serving. It gives it that beautiful, matte finish that just screams sophistication. It’s totally foolproof, and it really highlights the deep color of the pie.
If you want a little contrast, fresh fruit is my absolute favorite pairing for this deep chocolate flavor. Raspberries or tart cherries work wonders because their acidity cuts through the richness of the fudge so nicely. A pile of fresh berries right next to the slice looks gorgeous.
But if you’re feeling decadent (and you should be!), you absolutely need homemade whipped cream. Seriously, ditch the can. It takes two minutes to whip heavy cream, a tiny bit of powdered sugar, and some vanilla until you have soft peaks. I have an amazing recipe for fluffy vanilla buttercream that you can easily adapt to a whipped cream topping if you want even more structure!
Storage and Reheating Instructions for Classic Chocolate Pie Baking
Okay, you made it! You have this gorgeous, rich pie sitting on your counter, and now you have to resist eating the entire thing in one sitting—I understand the struggle!
Since this is a classic chocolate pie baking recipe featuring eggs and cream, we absolutely need to treat those leftovers right. When it comes to storage, you want to cover the pie loosely. Use plastic wrap, but make sure it doesn’t touch the surface of the pie filling if you happen to put whipped cream on it already. If you haven’t topped it, you can cover it snugly once it’s fully chilled.
The refrigerator is its happy place. This pie needs to stay chilled for the best texture—we are aiming for that firm, fudgy set, remember? It keeps beautifully for about four to five days in the fridge. Don’t leave it out on the counter for more than two hours; nobody wants a sad, soupy pie!
Now, about reheating: skip it! Seriously, don’t try to warm this pie up. When you reheat fudge, it melts into a liquid or gets grainy quickly. This pie is designed to be served cool. When you’re ready to slice a piece, take it out of the fridge just about 15 to 20 minutes before serving. That slight warming on the outside allows the filling to soften just *barely* enough to get that perfect, slightly gooey center when you cut into it. That little window of time is your absolute sweet spot for serving perfection.
Frequently Asked Questions about Making Chocolate Fudge Pie
I know you’ve got questions! Whenever I share a recipe that’s this rich and relies on that perfect set, people always wonder about slight tweaks. That’s totally normal, especially when you’re making something this decadent from scratch for the first time. Here are the questions I get most often about nailing this pie.
Can I turn this into a no bake fudge pie?
Yes, you absolutely can! That’s a great question, especially if you’re trying to avoid heating up the house. The recipe notes touch on this, but here’s the full scoop: Skip preheating the oven entirely. Mix your crust ingredients and press them firmly into the pan. Instead of baking it, just pop that crust into the freezer for about 20 minutes while you make the filling. For the filling, you follow steps 3 through 8 exactly—you still have to cook the mixture on the stovetop to thicken it and temper those eggs. Once the filling is smooth, pour it into the chilled crust, and then instead of baking, cover it loosely and stick it straight into the refrigerator. You’ll need to chill it much longer—at least 6 hours, but overnight is even better—for it to firm up properly. This is one of my favorite no bake fudge pie ideas when summer hits!
What is the best chocolate to use for intense chocolate pie flavor?
If you want that intense chocolate pie flavor that really stands up to the sugar and cream, you have to use good quality bittersweet chocolate. The recipe calls for 4 ounces of bittersweet chocolate, which generally means it’s in the 60% to 70% cacao range. That higher cacao percentage gives you that deep, slightly bitter edge that makes the pie taste grown-up and luxurious.
If you use standard semi-sweet, the pie will still be amazing—it’ll just veer a little closer to purely sweet. If you only have semi-sweet, don’t sweat it! Just know that using bittersweet chocolate is the secret weapon to really pulling off that *decadent* taste we are aiming for.
How do I prevent cracks when cooling my chocolate fudge pie?
Ah, surface cracks! They happen when the center cools and shrinks faster than the edges, or if the pie is jostled while setting. For this rich pie, we need a slow, gentle cool-down. I emphasized the two-hour cooling time on the rack, and that’s vital. Don’t take the pie straight from the oven and immediately put it into the fridge! The sudden temperature shock creates tension, leading to cracks.
After it cools on the counter following that initial two hours, transfer it carefully to the fridge. If you want absolutely guaranteed smoothness, you can place a layer of plastic wrap *over* the top of the filling (before it fully sets) once it’s cooled for about an hour on the counter. This slows down the rate at which moisture evaporates from the surface, keeping things beautifully uniform for slicing. If you’ve mastered this, check out my tips for easy weeknight dinners so you can save your energy for baking!
Estimated Nutritional Information for This Rich Chocolate Dessert Recipe
Because I come from a nutrition background, I know a lot of you are curious about what’s in this amazing creation, even though it’s pure indulgence! When you’re whipping up this rich chocolate dessert recipe, it is important to remember that precise numbers depend on the brands you use—for example, the fat content in your specific chocolate sandwich cookies can vary.
These figures below are based on tracking the ingredients listed in the recipe and are calculated for 8 generous slices. So, yes, this is a treat, but isn’t that what chocolate fudge pie is all about?
- Serving Size: 1 slice
- Calories: 380
- Sugar: 35g
- Fat: 24g (14g Saturated Fat)
- Carbohydrates: 38g
- Protein: 6g
- Cholesterol: 85mg
Please take this as a general guideline for your planning! If you’re looking for ways to incorporate more wholesome meals into your week, check out my guide to healthy lunch ideas. But for tonight? Enjoy every single glorious, fudgy bite of this pie!
PrintThe Ultimate Rich and Gooey Classic Chocolate Fudge Pie
Make this decadent dark chocolate pie from scratch for an intense chocolate flavor. This recipe delivers a simple, gooey chocolate pie that is perfect for any holiday gathering.
- Prep Time: 20 min
- Cook Time: 35 min
- Total Time: 55 min
- Yield: 8 servings 1x
- Category: Dessert
- Method: Baking
- Cuisine: American
- Diet: Vegetarian
Ingredients
- 1 1/2 cups crushed chocolate sandwich cookies (like Oreos)
- 6 tablespoons unsalted butter, melted
- 1 cup granulated sugar
- 1/2 cup unsweetened cocoa powder
- 1/4 teaspoon salt
- 1/2 cup heavy cream
- 1/4 cup milk
- 2 large eggs
- 1 teaspoon vanilla extract
- 4 ounces bittersweet chocolate, chopped
Instructions
- Preheat your oven to 350 degrees Fahrenheit. Prepare a 9-inch pie plate.
- Combine the crushed cookies and melted butter in a bowl. Press the mixture firmly into the bottom and up the sides of the pie plate to form the crust. Bake the crust for 8 minutes. Let it cool while you prepare the filling.
- In a medium saucepan, whisk together the sugar, cocoa powder, and salt. Gradually whisk in the heavy cream and milk until smooth.
- Cook the mixture over medium heat, stirring constantly, until it thickens slightly and just begins to bubble around the edges, about 5 to 7 minutes. Remove from heat immediately.
- In a separate bowl, lightly beat the eggs. Slowly temper the eggs by whisking about 1/2 cup of the hot chocolate mixture into the eggs. Then, pour the egg mixture back into the saucepan with the remaining hot chocolate mixture, whisking constantly.
- Return the saucepan to low heat. Cook, stirring constantly, for 1 minute. Do not let the mixture boil.
- Remove from heat and stir in the chopped bittersweet chocolate and vanilla extract until the chocolate is completely melted and the filling is smooth.
- Pour the creamy fudge pie filling into the cooled crust.
- Bake for 20 to 25 minutes, or until the edges are set but the center still has a slight jiggle.
- Cool the pie completely on a wire rack for at least 2 hours before chilling in the refrigerator for another 2 hours before slicing.
Notes
- For a richer flavor, substitute the bittersweet chocolate with semi-sweet chocolate.
- If you prefer a no bake fudge pie, you can skip baking the crust and filling, chilling the filling until firm instead.
- Serve slices topped with fresh whipped cream or a dusting of cocoa powder for presentation.
Nutrition
- Serving Size: 1 slice
- Calories: 380
- Sugar: 35
- Sodium: 210
- Fat: 24
- Saturated Fat: 14
- Unsaturated Fat: 10
- Trans Fat: 0.5
- Carbohydrates: 38
- Fiber: 3
- Protein: 6
- Cholesterol: 85