

When a celebration calls for something truly stunning—a centerpiece that whispers elegance and tastes like pure comfort—you reach for the classics, but you make them shine. That’s exactly what we’re doing today with this spectacular red velvet bundt cake. Baking red velvet isn’t just throwing ingredients together; it demands a little precision to get that famous velvety crumb without turning it into something dense. When I was developing recipes in the test kitchen, the balance of oil, buttermilk, and acid for that perfect reddish-brown hue was something I obsessed over. Trust me, nailing the technique for this showstopper dessert means you get that amazing, deeply flavored cake every single time, coated in the freshest cream cheese glaze.
- Why This Red Velvet Bundt Cake Recipe Is Your New Favorite
- Gathering Ingredients for Your Red Velvet Bundt Cake
- How to Prepare the Ultimate Red Velvet Bundt Cake
- Tips for a Perfect Moist Red Velvet Bundt
- Variations on the Red Velvet Bundt Cake
- Serving Suggestions for This Showstopper Dessert
- Storage and Reheating Instructions for Your Red Velvet Bundt Cake
- Frequently Asked Questions About This Red Velvet Bundt Cake Recipe
- Sharing Your Baking Success
Why This Red Velvet Bundt Cake Recipe Is Your New Favorite
I know there are a million red velvet recipes out there, but I promise you, this one is different. We aren’t fooling around with dry cakes here! This recipe was fine-tuned in my kitchen to make sure it’s always unbelievably tender and moist. If you’re tired of cakes that need three glasses of milk just to get down, you’re in the right place. It’s easy enough for a beginner baker but impressive enough for any holiday spread.
- Guaranteed Moisture: We rely heavily on oil and buttermilk here, which keeps the crumb incredibly soft—that’s the secret to a truly Moist Red Velvet Bundt that stays fresh for days.
- That ‘Velvet’ Texture: No one wants a tough cake! The balance of vinegar and baking soda works with the buttermilk to give you that signature, delicate, Tender Crumb Cake appearance and feel.
- Stunning Presentation: The Bundt shape automatically makes it look like a Showstopper Dessert without spending hours on fussy layers. Plus, the deep color is just gorgeous once that glaze drips down!
- Perfectly Balanced Flavor: It has that hint of cocoa tang you expect, but it’s not overly sweet—the richness is cut perfectly by the sharp, tangy cream cheese glaze we make.
- Made From Scratch Confidence: Using simple ingredients means you get superior flavor compared to the boxed stuff, and honestly, making the whole Red Velvet Bundt Cake Recipe from scratch is so rewarding. If you want another great scratch recipe, check out my moist chocolate banana bread!
Gathering Ingredients for Your Red Velvet Bundt Cake
Okay, the secret to any great bake starts right here, with the ingredients you lay out on the counter. For a red velvet bundt cake that truly sings, temperature matters—and I mean it! You absolutely must make sure your buttermilk and eggs are at room temperature before you start mixing. Chilly ingredients shock the batter, and that stops us from getting that signature smooth, velvety texture we’re aiming for.
I’ve broken down exactly what you need below, split between the cake itself and that glorious glaze that makes this cake so memorable. If you want to see my recipe for a classic frosting, you can bookmark my best cream cheese frosting recipe, but for this Bundt, we are keeping it glaze-style!
Ingredients for the Velvety Red Velvet Bundt Cake
This list focuses on liquid fats and dairy to guarantee moisture. That combination of oil and buttermilk is what really makes the structure so tender!
- 1 3/4 cups all-purpose flour
- 1 1/2 cups granulated sugar
- 1 teaspoon baking soda
- 1 teaspoon unsweetened cocoa powder
- 1/2 teaspoon salt
- 1 cup buttermilk, room temperature (Don’t skip this!)
- 1 cup vegetable oil (Oil keeps it moister than butter does in this style of cake!)
- 2 large eggs, room temperature
- 1 teaspoon white vinegar
- 1 teaspoon vanilla extract
- 1 tablespoon red food coloring (Use a good quality gel if you want that deep, stunning red color!)
Ingredients for the Tangy Cream Cheese Glaze Bundt Cake Topping
For the topping, make sure your cream cheese and butter are softened—otherwise, you’ll end up with tiny, stubborn lumps in your drizzle, and no one wants that!
- 1 teaspoon unsweetened cocoa powder (just a touch for depth)
- 4 ounces cream cheese, softened
- 1/2 cup unsalted butter, softened
- 2 cups powdered sugar
- 1 teaspoon vanilla extract
- 1 tablespoon milk or cream (We use this to thin it just right for drizzling)
How to Prepare the Ultimate Red Velvet Bundt Cake
This is where the magic really happens, and honestly, this is a straightforward cake if you follow my mixing rule: don’t overdo it! Think of it like making fluffy pancakes—you want everything combined, but that’s it. We’re skipping the creaming of butter and sugar here since we’re using oil, which is one step you get to skip! Remember to preheat your oven right away, and don’t skimp on prepping that pan; a sticky Bundt is a broken heart!
Mixing the Red Velvet Bundt Batter
First things first, get that oven hot to 350°F (175°C). Take your time in the beginning to really whisk those dry ingredients—the flour, sugar, baking soda, cocoa, and salt. You want everything evenly distributed before you do anything else. In a separate bowl, whisk the wet items: buttermilk, oil, eggs, vinegar, vanilla, and all that beautiful red coloring. When you finally pour the wet into the dry, mix on low speed until they are *just* incorporated. I mean it—stop mixing the second the last streaks of flour disappear. Overmixing develops gluten, and we want tender velvet, not a chewy rubber tire!
Baking and Cooling the Red Velvet Bundt Cake
Take your time greasing and flouring that Bundt pan, or better yet, use my go-to trick: spray it with baking spray that contains flour. Pour that rich red batter in evenly. Bake it for about 45 to 55 minutes. You always test a red velvet bundt cake by poking it with a wooden skewer—if it comes out clean with maybe a few moist crumbs attached, it’s perfect. Let it hang out in the pan for a good 15 minutes; this helps it set up. Then, flip it carefully onto a wire rack. It has to be completely cool before we even think about the glaze, or that pretty topping will just melt away. For next time, if you want to perfect your buttermilk game, check out my tips on making amazing buttermilk biscuits!

Making and Applying the Cream Cheese Glaze
While the cake cools down—which takes a minute—we whip up the glaze. Make sure your cream cheese and butter are nice and soft, as I mentioned earlier. Beat them until they look creamy, then slowly mix in the powdered sugar. If your glaze is too thick to drizzle nicely, add a touch of milk—a tiny bit at a time until it pours in slow, beautiful ribbons. Once the cake is totally cool to the touch, grab a fork or a spoon and gently drizzle that tangy topping all over the top, letting it run artistically down the fluted sides.
Tips for a Perfect Moist Red Velvet Bundt
If you want this red velvet bundt cake to truly live up to its name and be the Best Red Velvet Recipe you’ve ever tried, you need to pay attention to a few small details. It’s the difference between a good cake and a show-stopping masterpiece, and believe me, those little tweaks add up!
Achieving Deep Color in Your Red Velvet Bundt Cake
That iconic deep red color can be tricky, right? Sometimes it comes out looking suspiciously brownish-pink, and that’s just not dramatic enough for a holiday cake! Liquid food coloring just doesn’t cut it because it adds too much extra moisture, which can mess with our perfect ratio, and it dilutes the color too much. My hands-down advice is to use a high-quality gel food coloring instead of the liquid drops you grab at the regular grocery aisle. You use way less of it, which means you keep your batter consistency spot-on, but you get that vibrant, deep red hue that makes this dessert truly festive!
The Role of Buttermilk in a Tender Crumb Cake
I’ve been asked if you can just swap regular milk for buttermilk, and look, you *can* make a substitution in a pinch (just add a teaspoon of vinegar or lemon juice to regular milk and let it sit), but for this specific red velvet bundt cake to achieve that airy, Tender Crumb Cake texture, you really shouldn’t skip the real deal. Buttermilk is acidic, which reacts beautifully with the baking soda. This reaction is what gives us lift and keeps the cake delicately soft. It’s non-negotiable for authentic red velvet flavor and structure. If you want to learn more about how acid affects baking, you can check out some of the science behind flavor pairings here. And honestly, if you master buttermilk in this cake, you’ll make the fluffiest things ever, like my fluffy vanilla buttercream!
Variations on the Red Velvet Bundt Cake
While I think this simple, elegant topping is the gold standard for this cake, I know you are probably already dreaming about how to tweak it next time! Red velvet is just so versatile, and having this base recipe down opens up so many truly Festive Red Cake Ideas. It’s fun to play around, especially when you’ve already mastered the *tender crumb cake* itself. Don’t feel like you have to stick to the script every time you bake!
Making a Nothing Bundt Cake Copycat Style Red Velvet Bundt Cake
I get asked about the popular bakery copycat versions all the time. The major difference between my official glaze and the ultra-thick topping they use is sheer volume and consistency. If you want that thick, decadent blanket of white icing draping down the sides, you need to increase the powdered sugar in your glaze recipe significantly—maybe go up to 3 cups—and use very, very little milk, maybe just a teaspoon at a time. You want it thick enough that it doesn’t flow easily off a spoon. Also, make sure your cake is completely, totally cold, and then just pour it right over the top, letting gravity do the heavy lifting as it sets up.
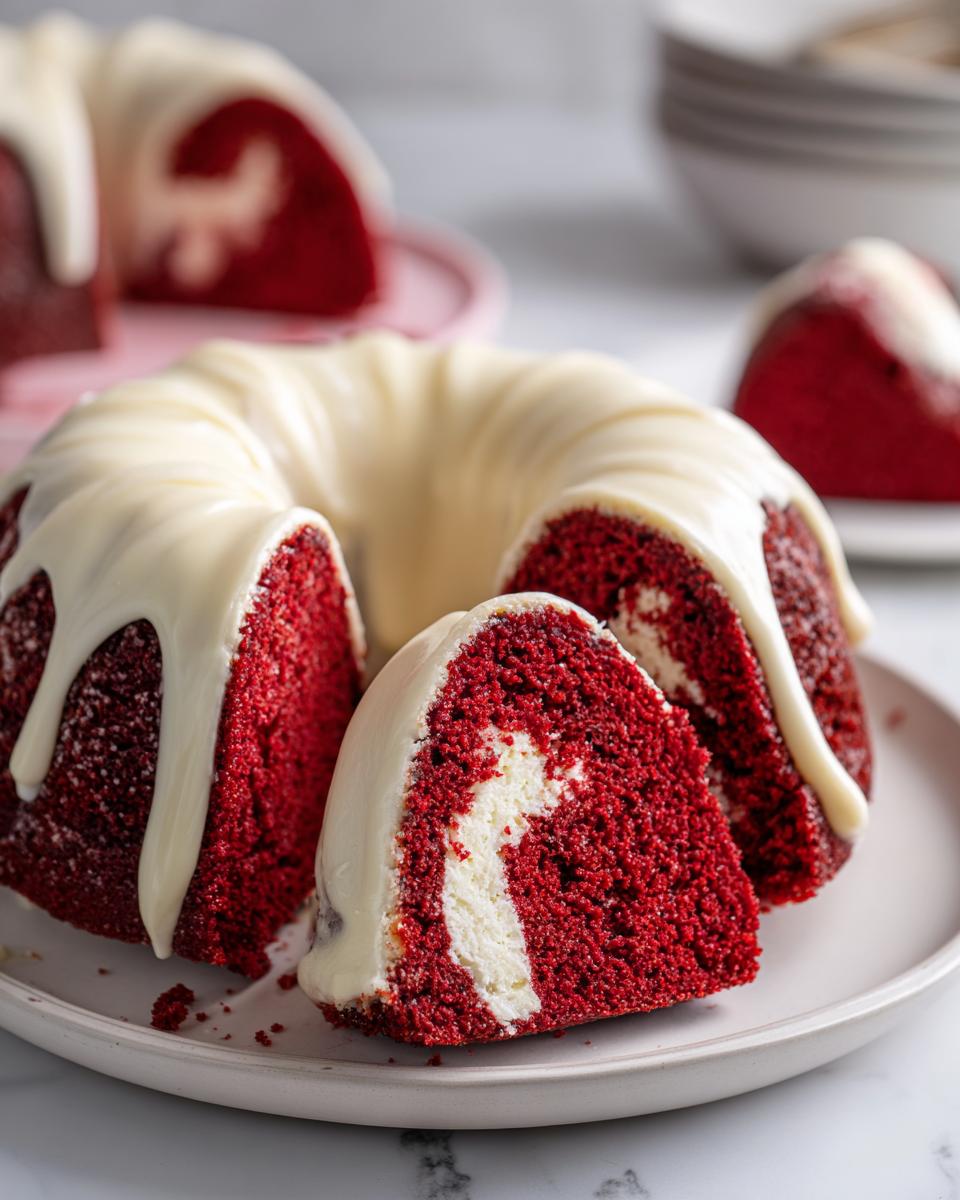
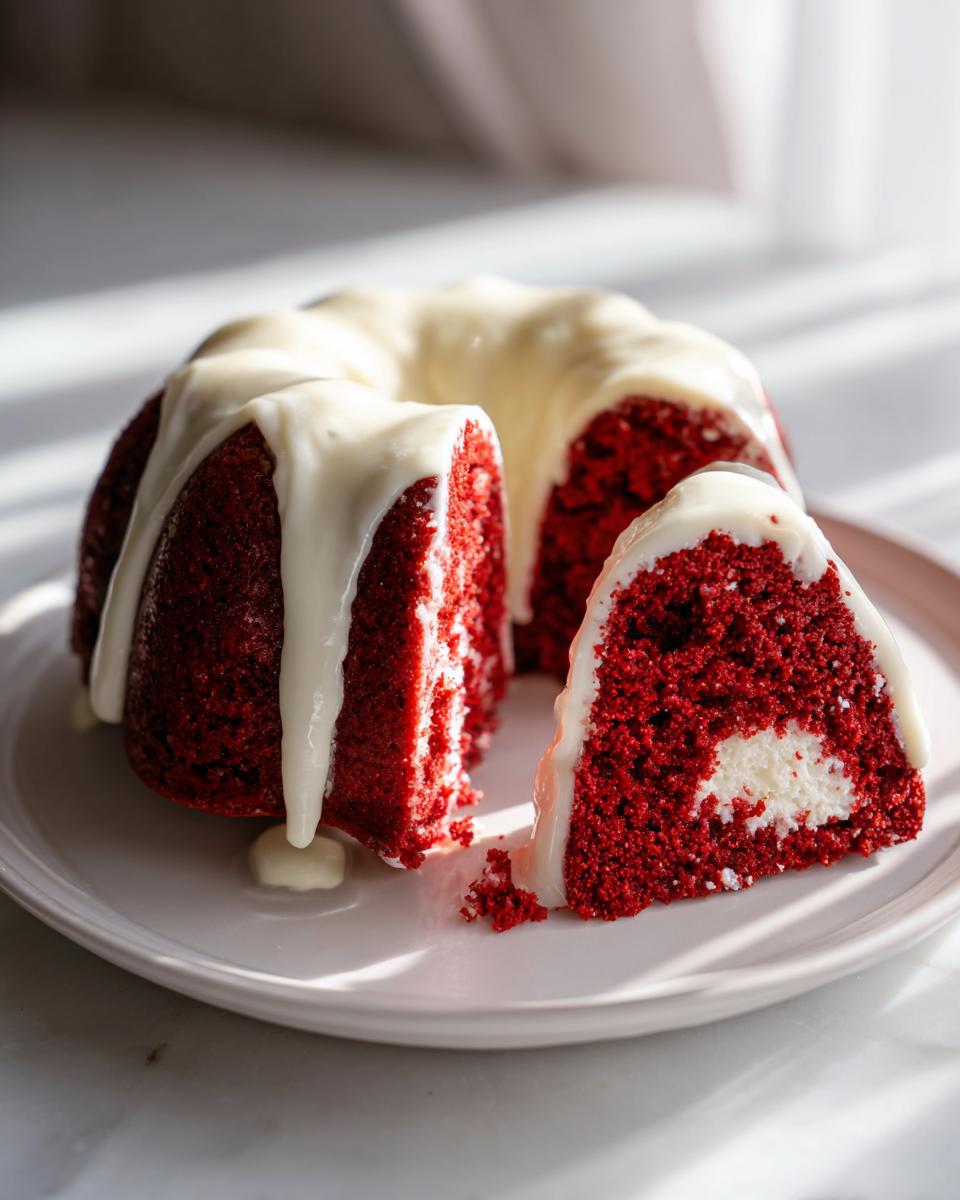
Adding a Cheesecake Swirl to Your Red Velvet Bundt Cake
This is where you can totally show off! If you’re interested in a *Red Velvet with Cheesecake Swirl* variation, you need to make a small batch of standard cheesecake filling separately. Once your red velvet bundt cake batter is in the pan, dollop spoonfuls of the cream cheese filling randomly throughout the top. Then, take a butter knife or a skewer and gently run it through the batter in a figure-eight motion just once or twice. You don’t want to over-swirl, or you’ll just end up with a pale pink cake. A couple of gentle passes is all you need to create those beautiful pockets of creamy richness!
If you enjoy putting your own spin on things, check out how I transformed traditional red velvet into amazing red velvet cinnamon rolls; it’s a completely different texture but uses that same amazing base flavor!
Serving Suggestions for This Showstopper Dessert
When you pull this gorgeous red velvet bundt cake out of the pan, it’s already a winner, right? It truly looks like a centerpiece! However, presentation isn’t just about the cake itself; it’s about what you put next to it on the platter. Since this cake is rich with buttermilk, cocoa, and that tangy glaze, you want pairings that cut through that richness and make every bite feel special. This is your signature, Showstopper Dessert moment, so lean into it!
My favorite way to serve this is on a simple white cake stand—letting that deep red color and the white drizzle really pop. If you are serving it for the holidays, I love surrounding the base of the cake with fresh, bright red cranberries and maybe a few sprigs of green rosemary. It looks festive without even trying hard, which is my favorite kind of effort!
For the beverage pairing, you need something creamy or something bubbly to cleanse the palate. If you’re hosting a winter party, a chilled glass of my creamy coquito is absolutely divine alongside the cocoa notes in the cake. If it’s a lighter afternoon event, skip the heavy coffee and go for a crisp Prosecco or even just a really good, strong black tea. The simplicity of the drink lets the velvet texture of the cake shine through without overpowering it. Honestly, once you take that first slice, you won’t even need anything else!
Storage and Reheating Instructions for Your Red Velvet Bundt Cake
Now that you’ve baked the most gorgeous, moist red velvet bundt cake, the last thing we want is for it to dry out! This is a cake rich in oil and buttermilk, which helps it stay fresh longer than a butter-based one, but proper storage is still key to keeping that velvety crumb perfect for days.
The rule of thumb here depends entirely on whether you’ve glazed it yet. A cake with cream cheese topping needs a little more care since dairy doesn’t love sitting out too long, even in sugar. I’m all about making your life easier, so here’s the breakdown on keeping this dessert amazing until everyone gets a slice.
Storing a Glazed Red Velvet Bundt Cake
If you covered your cake with that tangy cream cheese glaze, you absolutely must keep it in the fridge. Cover the cake plate or the cake itself loosely with plastic wrap or aluminum foil—don’t seal it tightly, though, because the moisture from the glaze can make the cake top overly soggy. It will happily last in the refrigerator for about four to five days. It might firm up a tiny bit from the cold, but don’t worry about that!
Reheating for That Fresh-From-The-Oven Feel
If you put your red velvet bundt cake in the fridge, it needs a little wake-up call before serving. You never want to serve a cold slice of red velvet! Take a slice out of the fridge about 30 to 45 minutes before you plan to eat it. If you’re really in a hurry, you can warm a single slice gently in the microwave for just about 10 to 15 seconds. It warms the crumb right back up and softens the glaze perfectly. Seriously, don’t try to heat the whole cake in the microwave; it’ll just get tough!
Storing an Unglazed Cake (The Best Way to Store)
Honestly, my preference is to bake the cake, let it cool completely, and store it completely naked (no glaze!) on the counter. If you wrap the entire cooled cake tightly in two layers of plastic wrap or place it in a sealed cake carrier, it stays incredibly moist at room temperature for at least three days. Room temperature cake always tastes better than refrigerated cake, in my opinion! Store it in a cool, dark pantry, and then, right before you serve it, whip up that lovely easy red velvet cake glaze fresh. That’s the professional way to ensure maximum flavor and moisture retention!
Frequently Asked Questions About This Red Velvet Bundt Cake Recipe
It’s totally normal to have a few questions when you’re tackling a star recipe like this! Baking a red velvet bundt cake should feel inspiring, not intimidating. I’ve pulled together the questions I get asked most often, especially from friends trying to make this From Scratch Bundt Cake for the first time. If I missed something, just drop a comment below, and I’ll jump in!
Can I substitute the buttermilk in this Red Velvet Bundt Cake Recipe?
I know buttermilk isn’t always sitting in everyone’s fridge, so let’s talk substitutions for this Moist Red Velvet Bundt. You *can* make a quick substitute if you absolutely have to! Just measure out one cup of regular milk—whole milk works best—and stir in one tablespoon of white vinegar or lemon juice. Let that sit on the counter for about five to ten minutes until it starts to curdle slightly. That creates lactic acid, which mimics buttermilk’s effect. However, I have to be honest with you: using real buttermilk is always worth the trip to the store. It has a deeper, more complex tang that just works better with the cocoa and vinegar in the recipe. The final result is noticeably softer when you use the real thing.
Can I use a standard round cake pan instead of a Bundt pan?
Yes, you certainly can! This is one of the great things about this Easy Red Velvet Cake recipe—it’s flexible. Since a Bundt pan is usually quite deep, if you divide this batter between two 8 or 9-inch standard round cake pans, the baking time will drop significantly. I’d start checking those layers around the 28 to 32-minute mark. You’re looking for the same clean toothpick test, but because the layers are thinner, they cook faster. If you decide to use 9×13 inch pan, you might need to increase your baking time slightly since the batter spreads out more but is still relatively deep.
Why do I need both vinegar and baking soda?
This is a classic chemical reaction question, and it’s vital for red velvet! The vinegar (an acid) reacts with the baking soda (a base) to produce carbon dioxide gas. This gas creates bubbles in the batter, which is what gives your cake lift and that light, airy texture inside that smooth crumb. Without that reaction bubbling away, your cake would be flat and dense. The cocoa powder, which is also slightly acidic, helps fuel that reaction, but the vinegar gives it the extra boost it needs to be beautifully tender!
If you’re ready to jump back into the main recipe steps now that you have all your questions answered, you can head straight back to the instructions section. Getting these little details right means you’re set up for success when tackling those easy weeknight dinners later this week, too!
Sharing Your Baking Success
Seeing your beautiful bakes pop up in my inbox or on social media is honestly the best part of my day! You’ve just conquered a showstopper dessert, and I want to celebrate that victory with you. This red velvet bundt cake is a real gem, and knowing that you managed to get that perfect, rich, velvety texture makes all the testing and tweaking worth it.
When you get a moment, I’d be thrilled if you’d come back right here and leave a star rating. Did it turn out perfectly moist? Was the cream cheese glaze your favorite part? Your feedback helps everyone else who is a little nervous about taking on a from scratch bundt cake know that they can do it too!
If you snapped a picture of your beautiful, jewel-toned creation—especially if you decorated it up for a holiday—please tag me! I truly love seeing how everyone makes these recipes their own. It builds such a wonderful community around getting delicious, reliable food on the table without all the stress. If you ever have any questions or need help troubleshooting a future bake, navigating to the contact page is the fastest way to reach me directly.
Happy baking, and thank you for trusting me with your kitchen creations!
PrintMoist Red Velvet Bundt Cake with Tangy Cream Cheese Glaze
Bake a show-stopping, moist Red Velvet Bundt Cake from scratch that delivers that signature deep red color and rich cocoa flavor. This recipe focuses on achieving a tender crumb and tops it with a simple, tangy cream cheese glaze for an elegant dessert.
- Prep Time: 20 min
- Cook Time: 50 min
- Total Time: 1 hr 10 min
- Yield: 12 servings 1x
- Category: Dessert
- Method: Baking
- Cuisine: American
- Diet: Vegetarian
Ingredients
- 1 3/4 cups all-purpose flour
- 1 1/2 cups granulated sugar
- 1 teaspoon baking soda
- 1 teaspoon unsweetened cocoa powder
- 1/2 teaspoon salt
- 1 cup buttermilk, room temperature
- 1 cup vegetable oil
- 2 large eggs, room temperature
- 1 teaspoon white vinegar
- 1 teaspoon vanilla extract
- 1 tablespoon red food coloring (or more for deep color)
- 1 teaspoon unsweetened cocoa powder (for the glaze)
- 4 ounces cream cheese, softened (for the glaze)
- 1/2 cup unsalted butter, softened (for the glaze)
- 2 cups powdered sugar (for the glaze)
- 1 teaspoon vanilla extract (for the glaze)
- 1 tablespoon milk or cream (for the glaze)
Instructions
- Preheat your oven to 350°F (175°C). Grease and flour a 10-cup Bundt pan thoroughly.
- In a large bowl, whisk together the flour, granulated sugar, baking soda, 1 teaspoon cocoa powder, and salt.
- In a separate medium bowl, whisk together the buttermilk, oil, eggs, vinegar, vanilla extract, and red food coloring until fully combined.
- Pour the wet ingredients into the dry ingredients. Mix on low speed until just combined. Do not overmix the batter.
- Pour the batter evenly into the prepared Bundt pan.
- Bake for 45 to 55 minutes, or until a wooden skewer inserted into the center comes out clean.
- Let the cake cool in the pan on a wire rack for 15 minutes before inverting it onto the rack to cool completely.
- Prepare the cream cheese glaze: In a medium bowl, beat the softened cream cheese and butter together until smooth.
- Gradually beat in the powdered sugar until incorporated. Add the 1 teaspoon vanilla extract and milk or cream. Beat until the glaze is smooth and pourable. Add a little more milk if you prefer a thinner glaze.
- Once the cake is completely cool, drizzle the cream cheese glaze over the top, allowing it to drip down the sides.
- Slice and serve this showstopper dessert.
Notes
- For the deepest red color, use a high-quality gel food coloring instead of liquid coloring.
- Buttermilk is key for the tender crumb; do not substitute with regular milk if possible.
- To make a copycat Nothing Bundt Cake style topping, use a thicker glaze and drizzle it heavily over the cooled cake.
Nutrition
- Serving Size: 1 slice
- Calories: 450
- Sugar: 55g
- Sodium: 250mg
- Fat: 24g
- Saturated Fat: 8g
- Unsaturated Fat: 16g
- Trans Fat: 0g
- Carbohydrates: 58g
- Fiber: 1g
- Protein: 4g
- Cholesterol: 50mg