
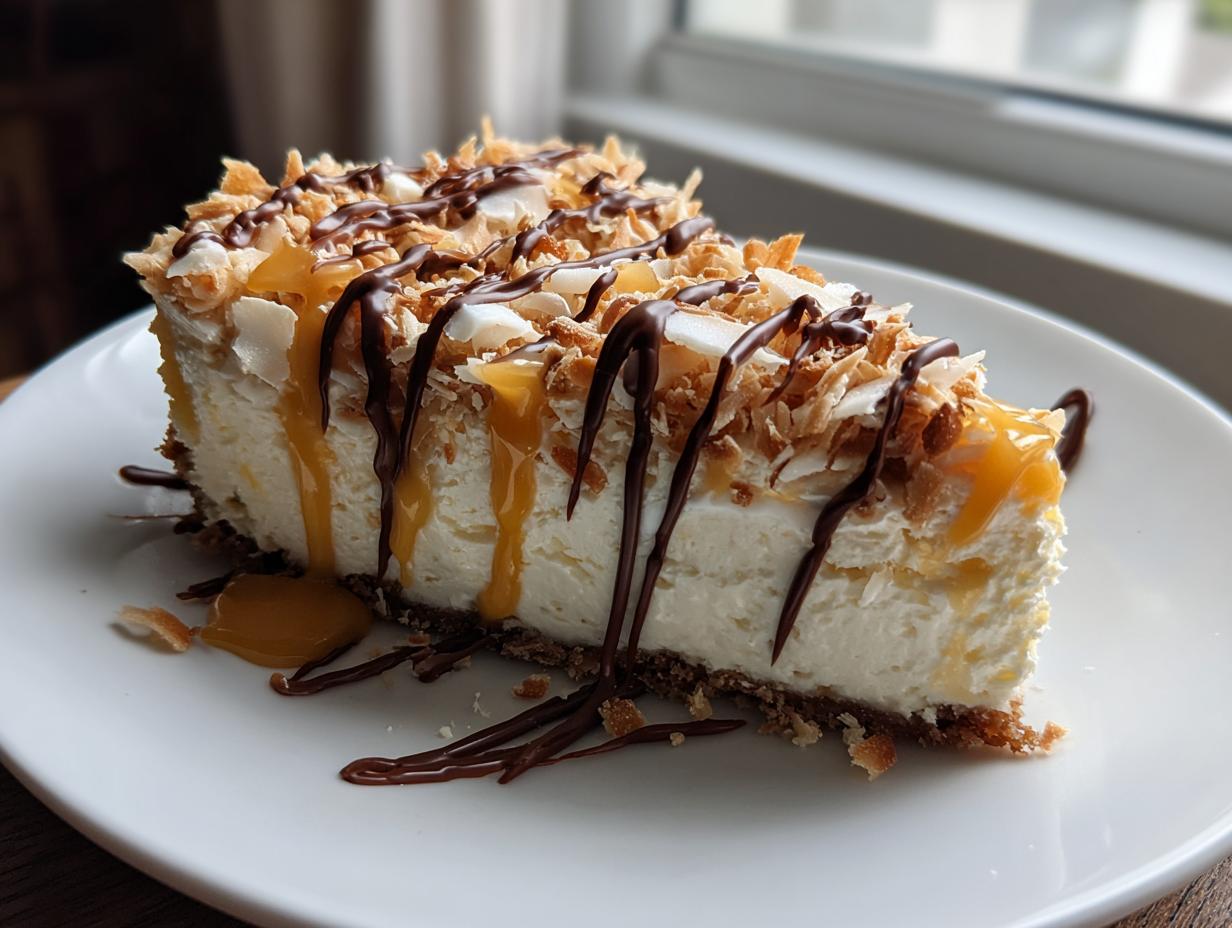
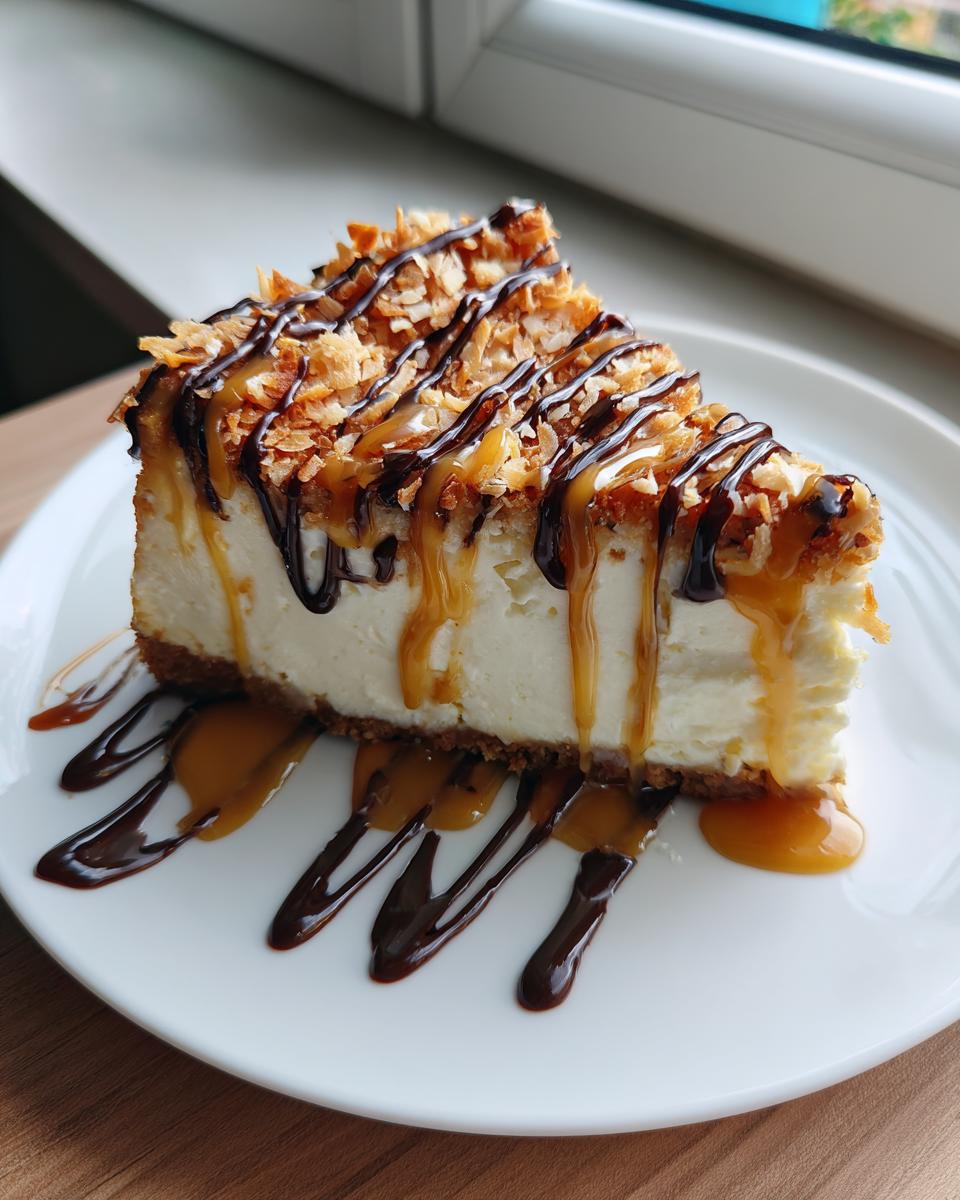
I’ve spent years in the kitchen trying to turn those indulgent, perfectly balanced flavors we all crave into something completely approachable for the home baker. And honestly, sometimes fusion desserts are tricky; they can end up tasting like a confused mess! But trust me when I say that this Samoa Cheesecake recipe is the absolute exception. This isn’t just a dessert; it’s the perfect marriage of creamy, decadent cheesecake filling with the distinct, unforgettable trio of toasted coconut, gooey caramel, and rich chocolate drizzle that we know and love from those famous cookies.
Here at Cooking by Jade, my goal has always been to demystify those ‘showstopper’ desserts. I don’t want you to be intimidated by layers or water baths. I’ve tested this until the texture was flawless—smooth, dense, and utterly luxurious. You get that satisfying crunch from the chocolate cookie crust, followed by cloud-like cream cheese, and then BAM—the tropical, sweet topping hits you. If you’re looking for a recipe that guarantees gasps of delight at your next gathering, you’ve found it. You can explore more of my easy, reliable dessert recipes right here, but save that one for later, because this cheesecake is a must-try!
- Why This Samoa Cheesecake Recipe Is Your New Favorite
- Gathering Ingredients for Your Samoa Cheesecake Recipe
- How to Prepare Your Decadent Samoa Cheesecake
- Tips for Success with Your Caramel Coconut Cheesecake
- Variations: Baked vs No Bake Samoa Cheesecake
- Storage and Reheating Instructions for Leftover Samoa Cheesecake
- Frequently Asked Questions About This Recipe
- Nutritional Data Estimate
- Share Your Baking Journey
Why This Samoa Cheesecake Recipe Is Your New Favorite
I know what you’re thinking: “Another cheesecake?” But this isn’t just any dessert; this is peak indulgence, designed specifically so you can look like a baking genius without breaking a sweat. I tested this formula over and over to make sure every layer sings. It’s one of those truly decadent cheesecake ideas that looks like it took three days but comes together surprisingly easily.
- It’s a genuine showstopper dessert. Seriously, the toppings alone make people stop mid-sentence.
- The texture profile is everything: that cool, dense creaminess against the crunch of the crust and the stickiness of the caramel.
- It requires simple steps—no fancy pastry bags needed for the final look!
Perfect Texture in Every Layer
We nail the texture because we treat each layer right. The chocolate wafer crust bakes up crisp and sturdy, providing the perfect base. Then you have that velvety-smooth cheesecake layer—I swear, no cracks here if you use the water bath! Finally, the topping blends the melt of the caramel, the chew of the coconut, and that final silky chocolate ribbon.
Inspired by Girl Scout Cookie Desserts
You get all the nostalgic joy of those famous cookies, just elevated. Seriously, if you’re a fan of Girl Scout Cookie Desserts, this checks every single box. It’s the caramel, the chocolate hint, and that distinct toasted coconut that makes it instantly recognizable. It tastes like a celebration!
Gathering Ingredients for Your Samoa Cheesecake Recipe
Okay, let’s talk ingredients. Because this is a layered dessert, it looks like a long list, but don’t panic! It’s really just three simple groups: the base, the filling, and the party on top. I always stress using room temperature dairy for the filling—it’s honestly the secret to amazing Creamy Cheesecake Toppings texture. If your cream cheese is cold, you get lumps, and we absolutely do not want lumps in this dream creation!
Also, a quick housekeeping note on the caramel: you can definitely buy a good quality jar of thick caramel sauce, and I won’t tell anyone! But if you’re feeling ambitious, making your own caramel is incredibly rewarding. If you’re curious about sauces in general, I have a fun one for teriyaki you can check out here, but for this, grab the thickest caramel sauce you can find for maximum gooeyness.
For the Chocolate Wafer Crust
We are skipping graham crackers today because we want that deep, dark chocolate base that plays so well with the caramel. This combination is what makes it comparable to other great Oreo Crust Desserts. You’ll need:
- 1 3/4 cups chocolate wafer cookie crumbs (Trust me, using Oreos without the cream filling works too!)
- 6 tablespoons unsalted butter, melted (Make sure this is measured correctly!)
- 1/4 cup granulated sugar
For the Creamy Cheesecake Filling
This is where the magic happens! Remember what I said about room temperature? Get your cream cheese out about two hours before you plan to start mixing. Smoothness equals success!
- 3 (8-ounce) packages cream cheese, softened (Don’t cheat on the packages; this needs the structure!)
- 1 1/2 cups granulated sugar
- 1/4 cup sour cream (This adds a lovely little tang to cut the sweetness!)
- 1 teaspoon vanilla extract
- 3 large eggs (Room temperature is key for integrating them without overmixing!)
For the Caramel Coconut Topping and Chocolate Drizzle
This topping is what transforms a good cheesecake into *this* cheesecake. We want layers of texture here. If your coconut is looking pale, head down to the next section where I explain how to get those perfect golden edges for great Toasted Coconut Desserts.
- 1 cup sweetened flaked coconut, toasted
- 1 cup caramel sauce, divided (Half for swirling, half for drizzling!)
- 1/2 cup semi-sweet chocolate chips
- 1 tablespoon coconut oil (This helps the chocolate stay perfectly drizzle-able and shiny!)
How to Prepare Your Decadent Samoa Cheesecake
Alright, buckle up! This is where we turn those beautiful ingredients into that show-stopping dessert we’ve been talking about. Don’t let the multiple steps fool you; if you follow my lead, this baked cheesecake is honestly foolproof. The key really is sticking to the sequence and remembering that slow and steady wins the race, especially with cheesecake!
Step 1: Building and Pre-Baking the Crust
First things first: get your oven up to temperature—we need it at 325°F (160°C). While that’s heating, let’s deal with the springform pan. This is super important for the water bath later, so listen up! You need heavy-duty aluminum foil, and you must wrap the outside of your 9-inch springform pan TIGHTLY. I usually do three good layers of foil around the outside, going high up the sides. This keeps any sneaky water from creeping in and ruining our beautiful chocolate base.
Mix your crust ingredients—the crumbs, the quarter cup of sugar, and the melted butter—until it looks like damp sand. Press it firmly and evenly into the bottom of that wrapped pan. Then, pop it in the oven for exactly 10 minutes. We just want to set it up. When it comes out, let it cool down a little bit while we tackle the filling.
Step 2: Mixing the Perfect Cheesecake Filling
Remember I stressed room temperature ingredients? Now is why! Beat that softened cream cheese until it’s solo smooth. Then add the main sugar, the vanilla, and the sour cream. Mix until it’s perfectly creamy. Now, the eggs—and this is where I need you to be gentle!
Add your eggs one at a time. You only want to mix until *just* combined after each egg goes in. Seriously, stop the mixer the second that yolk disappears. Overmixing at this stage whips too much air in, and that air escapes during baking, causing those dreaded cracks. We want density and smoothness, not air pockets!
Step 3: Layering the Caramel and Coconut for the Samoa Cheesecake
This layering technique is what turns this into a true Samoa Cheesecake! Take half of that beautiful, creamy filling and gently pour it right over your crust. Then, sprinkle half of your already toasted coconut over that layer. Next, take half of your yummy caramel sauce and drizzle it randomly over the coconut. Don’t try to be neat here; you want little pockets of gooeyness!
Finally, pour the remaining cheesecake batter over that middle layer. You don’t need to smooth the top perfectly, because the remaining caramel and coconut toppings will cover it later. Just pour and let gravity do the shaping!
Step 4: Baking with a Water Bath and Cooling
Time for the water bath, sometimes called a *bain-marie*. It sounds fancy, but it’s just about creating steam so the cheesecake bakes evenly and gently. Place your foil-wrapped pan into your larger roasting pan first. Then, carefully pour hot water—I mean hot, almost boiling—into the roasting pan until the water comes halfway up the sides of your cheesecake pan. Be very careful not to splash water inside the foil!
Bake this setup for 60 to 75 minutes. You’ll know it’s nearly done when the edges look set, but if you gently nudge the pan, the center still jiggles a tiny bit, like Jell-O. When you hit that point, turn the oven OFF immediately. Crack the oven door open just a touch—use a wooden spoon to prop it if you need to—and let that cheesecake cool slowly inside for a whole hour. This gradual temperature drop is the absolute best way to prevent those surface cracks. After that hour, take it out of the water bath, remove the foil, let it cool completely on the counter, and then—this is the hardest part—chill it for at least six hours, but overnight is always better for this amazing Samoa Cheesecake!
Step 5: Final Toppings: Caramel, Coconut, and Chocolate Drizzle Cheesecake
Once it’s fully chilled and firm, you can release the springform ring. Run a thin knife around the edge first, just to make sure nothing sticks! Now for the grand finale makeover!
You’ll warm your remaining caramel sauce just a touch so it flows nicely, and spread that evenly over the top. Then, sprinkle the rest of your toasted coconut across the caramel. For the chocolate, I melt the chips with just a touch of coconut oil in the microwave—30 seconds at a time, stirring well in between. The oil makes the chocolate drizzle shiny and glossy, which just makes this Chocolate Drizzle Cheesecake look incredible. Drizzle that melted chocolate all over the top. Slice it up cold, and you have achieved perfection!
I used a technique for the creamy filling that helps with the final texture, which you can check out in my recipe for creamy mango sticky rice—it’s all about mixing gently!
Tips for Success with Your Caramel Coconut Cheesecake
Look, I want you to have the most reliable, delicious baking experience possible. This isn’t just about following steps; it’s about understanding *why* we do them. When you master these little tweaks, you move from just following a recipe to truly understanding how to make any Creamy Cheesecake Toppings shine. Cheesecake can be intimidating, but once you know the secrets to the toppings and the bake, you’ll feel totally confident making this again and again.
Perfectly Toasting Coconut Desserts Elements
That toasted coconut? It’s non-negotiable for the authentic Samoa flavor, but you can ruin it in five seconds flat! If you haven’t toasted your coconut yet, please take heed. Spread it out in one single, even layer on a baking sheet. Get your oven heated to 350°F (175°C).
Now, watch it like a hawk! It usually takes between five and eight minutes. It can go from golden brown to burnt charcoal lighting quick. Stir it around halfway through baking to make sure every shred gets kissed by the heat equally. Pull it out the second it turns a beautiful, light gold. It will smell amazing, and it adds such a depth of flavor compared to plain old raw coconut.
Achieving a Smooth, Crack-Free Samoa Cheesecake
I keep coming back to this because it’s the difference between a basic cheesecake and the showstopper we are aiming for. The enemies of smooth cheesecake are high heat and rapid temperature change. That’s why the water bath is your best friend! It essentially steams the cake, keeping the moisture perfect so the proteins in the eggs set slowly and evenly.
And then, the slow cool-down inside the turned-off oven is just as important. If you yank that cool cheesecake straight out into the cold kitchen air, it shrinks too fast, and *crack*—you’ve got a thermal shock fracture right on top. Patience during cooling guarantees that beautiful, smooth surface, so when you add your drizzle later, it sits perfectly. If you want to read more about slow cooking and baking reliability, I talk a little bit about getting that patience down when developing my bread pudding recipe, too!
Variations: Baked vs No Bake Samoa Cheesecake
I get asked all the time if you can skip the oven entirely, especially when it’s already hot outside! And you absolutely can make a fantastic No Bake Samoa Cheesecake. It changes the texture a bit, moving it away from that dense, creamy egg-set feel to something lighter, more like a mousse, but the flavor profile is all there!
If you decide to ditch the oven, the first change is easy: toss out that heavy water bath plan! For the crust, you can definitely stick with the chocolate wafers, though many no-bake recipes lean toward plain graham crackers for a softer base. Just mix your crumbs with melted butter and press it into your pan—but don’t bake it! Just chill it for about 20 minutes while you whip up the filling.
The filling itself needs a little adjustment for the no-bake route. Since we aren’t using eggs to set the cheese, you rely on stabilizers like gelatin or extra fat to do the heavy lifting. You’ll need to soften your cream cheese and then whip it up with sugar and sour cream, just like before, but instead of eggs, you’ll likely add some Cool Whip or heavy cream that’s been whipped stiff. You mix that stabilizing agent in gently, pour it over the chilled crust, and then layer your caramel and coconut inside and on top.
The essential part of the no-bake version is the chilling time. Instead of 6 hours, you need this beauty to set up nice and firm—I usually aim for 8 hours minimum, or even better, overnight. It’s a great option when you need a “make-ahead” showstopper. If you are interested in other takes on lighter desserts, I have a great recipe for protein cheesecake that’s naturally lower in sugar, too!
Storage and Reheating Instructions for Leftover Samoa Cheesecake
Now, this is the part where I hope you have leftovers, because that means you made a successful, huge, decadent dessert! Let’s be real, though—a rich creation like this Samoa Cheesecake tastes even better the next day once all those beautiful caramel and coconut flavors have had time to really soak into the cheesecake itself. The texture holds up beautifully, provided you store it correctly.
The number one rule for keeping any cheesecake fresh is airtight coverage. Once you’ve sliced into it, cover the top of the remaining cake directly with plastic wrap—try not to let the wrap touch the toppings if you can help it, especially the chocolate drizzle which can smear. If you can’t cover the whole thing easily, just cut individual servings and store those in separate small containers.
You can keep this cheesecake safely in the refrigerator for about four to five days. Because it’s so rich, it keeps its texture well, but honestly, I doubt it will last that long! Just make sure it stays chilled; never leave cheesecake sitting out at room temperature for longer than two hours, not even for a quick taste test.
Can I Freeze It?
Yes, you absolutely can freeze it for up to a month! But here’s the thing: you must freeze it *before* you put the sticky toppings on. Once it’s totally set and chilled, take it out of the springform pan, wrap the whole cheesecake tightly in a layer of plastic wrap, and then cover that whole package in a layer of aluminum foil. That double wrapping stops freezer burn and flavor absorption.
When you want to bring it back out, just transfer the wrapped cake right into the fridge and let it thaw slowly overnight. Once it’s thawed, *then* you can top it with your caramel, coconut, and chocolate drizzle. Freezing the base keeps the creamy texture surprisingly intact!
Reheating Slices? (A Word of Caution!)
If you are just warming up a single slice that you want to eat warm—maybe you’re not a cold cheesecake person, which is fine, weirdo!—you should only ever gently warm the topping part. Cheesecakes should always be enjoyed chilled for that classic texture. If you microwave the whole slice, that rich cream cheese layer turns soupy really fast.
If you *must* warm it, take just the slice you want to eat, scrape off the caramel/coconut topping onto a small microwave-safe plate, and zap that topping for maybe 10 seconds until it’s soft and droopy. Eat that warm topping over your cold slice of cheesecake. That way you get some of that warm, gooey lava texture without ruining the structure of the actual cheesecake filling. Sometimes it’s about adjusting how we eat leftovers rather than trying to reheat the whole thing, you know?
Frequently Asked Questions About This Recipe
I know when I’m trying a new big recipe, I always have a few quick questions spinning around in my head before I start. Cheesecake making always seems to bring out the second-guessers in all of us, but I promise this recipe is solid! Here are the things people usually ask when they’re first diving into this decadence. If you’re looking for quick dinner solutions after you’ve finished this big dessert project, check out my thoughts on easy weeknight dinners!
Can I use a different cookie for the crust?
You absolutely can! I chose the chocolate wafer crumbs because I love how they mimic classic chocolate cookies, creating a wonderful dark contrast to the creamy filling—they really feel right at home with all the other delicious layers in these Oreo Crust Desserts. If you don’t have chocolate wafers, two cups of crushed Oreos (filling scraped out, or just use the whole thing if you like it sweeter!) or even standard graham crackers work just fine. Just remember that if you use graham crackers, you’re losing a little bit of that deep chocolate element that plays so well with the caramel on top.
What is the best way to make homemade caramel sauce?
Oh, homemade caramel is just the superior choice! If you want that true, rich flavor, I highly recommend making a batch from scratch. It involves gently melting sugar, adding butter, and then slowly stabilizing it with heavy cream. It’s easy enough that I even share tips on making homemade sauces where the technique applies! However, if you’re rushing, go for a store-bought jar of thick, high-quality caramel sauce. Just make sure it’s thick when cool so it doesn’t bleed right into your cheesecake layer when you spread it!
Is this recipe suitable for Holiday Cheesecake Recipes?
Oh, absolutely! This is practically *made* for the holidays or any big celebration! Because it’s so visual—all those layers of dark crust, white filling, golden coconut, and dark chocolate drizzle—it looks stunning coming out of the oven. It is definitely one of those decadent Holiday Cheesecake Recipes that feels special without needing twelve different decorating tools. People will definitely ask you for the recipe!
Nutritional Data Estimate
I always keep an eye on the nutrition facts, even when I’m making something this gloriously decadent! Look, this is a rich, showstopper dessert, so we aren’t looking at diet food here. But it’s good practice to know what you’re working with, right? I pulled together the estimates for a single slice of our Samoa Cheesecake below, mainly so if someone asks, I have an answer!
But I need to give you the standard disclaimer that Jade always insists on: these numbers are based on the standard ingredients listed and general serving sizes. If you swap out the sour cream for something else, or use a different brand of chocolate chips, these figures will shift a little. Always treat these figures as a helpful estimate rather than an exact science!
- Serving Size: 1 slice
- Calories: 550
- Fat: 35g (of which Saturated Fat is about 20g)
- Carbohydrates: 55g
- Protein: 8g
- Sugar: 45g
- Cholesterol: 110mg
See? High in deliciousness, low in… well, everything else! But honestly, when you’re serving up one of the best cheesecake recipes out there, you gotta embrace the richness. Knowing that the fat content is mostly the good stuff from the cream cheese and butter helps balance out the massive sugar hit from the caramel and chocolate drizzle!
Share Your Baking Journey
Phew! You did it! You managed to wrestle caramel, coconut, chocolate, and a whole cheesecake into submission, and I bet it looks absolutely incredible. Now that you’ve created what I truly believe is one of the best cheesecake recipes out there, I would absolutely love to see your creation!
Sharing your success is the best part of this whole process for me. When you’re ready to dig in, please take a picture of your stunning final product—maybe show off that perfect chocolate drizzle or that beautiful toasted coconut layer! Tag me on social media so I can swoon over your beautiful Showstopper Desserts. Seeing your results fuels me to keep developing these fun, approachable recipes.
And if you made it all the way through the water bath and the chilling process and this dessert truly wowed your crowd, please come back and leave a star rating! Five stars helps other home cooks like you feel confident trying out this amazing layered dessert. Your feedback means everything to me as I continue to refine recipes to make home baking stress-free and delicious.
If you have any leftover thoughts or questions about the process—maybe you want to know how to store the leftovers, or you want to try adapting it further—don’t hesitate to reach out through the contact page. Happy baking, friend!
PrintDecadent Samoa Cheesecake Recipe
Make this showstopper dessert that combines creamy cheesecake with the flavors of Girl Scout Samoa cookies: toasted coconut, gooey caramel, and rich chocolate drizzle.
- Prep Time: 30 min
- Cook Time: 75 min
- Total Time: 8 hours 45 min
- Yield: 12 servings 1x
- Category: Dessert
- Method: Baking
- Cuisine: American
- Diet: Vegetarian
Ingredients
- 1 3/4 cups chocolate wafer cookie crumbs (about 30 cookies)
- 1/4 cup granulated sugar
- 6 tablespoons unsalted butter, melted
- 3 (8-ounce) packages cream cheese, softened
- 1 1/2 cups granulated sugar
- 1 teaspoon vanilla extract
- 1/4 cup sour cream
- 3 large eggs
- 1 cup sweetened flaked coconut, toasted
- 1 cup caramel sauce, divided
- 1/2 cup semi-sweet chocolate chips
- 1 tablespoon coconut oil
Instructions
- Preheat your oven to 325°F (160°C). Wrap the outside of a 9-inch springform pan tightly with heavy-duty aluminum foil.
- Prepare the crust: Mix the chocolate wafer crumbs, 1/4 cup sugar, and melted butter until combined. Press the mixture firmly into the bottom of the prepared springform pan. Bake for 10 minutes. Let the crust cool while you prepare the filling.
- Prepare the cheesecake filling: Beat the softened cream cheese, 1 1/2 cups sugar, vanilla extract, and sour cream in a large bowl with an electric mixer until smooth. Beat in the eggs one at a time, mixing just until combined after each addition. Do not overmix.
- Pour half of the cheesecake batter over the cooled crust. Sprinkle half of the toasted coconut over the batter. Drizzle half of the caramel sauce over the coconut layer. Gently pour the remaining batter over the top.
- Create a water bath: Place the foil-wrapped springform pan into a larger roasting pan. Carefully pour hot water into the roasting pan until it reaches halfway up the sides of the springform pan.
- Bake for 60 to 75 minutes, or until the edges are set but the center still jiggles slightly.
- Turn off the oven, crack the door open slightly, and let the cheesecake cool inside the oven for 1 hour. Remove the cheesecake from the water bath and let it cool completely on a wire rack. Chill in the refrigerator for at least 6 hours, or preferably overnight.
- Prepare the topping: Once chilled, gently run a knife around the edge of the cheesecake before releasing the springform side.
- Warm the remaining caramel sauce slightly if needed for drizzling. Top the cheesecake evenly with the remaining toasted coconut. Drizzle the remaining caramel sauce over the top.
- Make the chocolate drizzle: Place the chocolate chips and coconut oil in a microwave-safe bowl. Microwave in 30-second intervals, stirring between each, until smooth. Drizzle the melted chocolate over the caramel topping.
- Slice and serve cold.
Notes
- To toast coconut, spread it in a single layer on a baking sheet and bake at 350°F (175°C) for 5 to 8 minutes, watching closely to prevent burning.
- If you prefer a no bake Samoa cheesecake, use a graham cracker crust and chill the filling mixture until firm instead of baking.
- For a richer chocolate topping, use dark chocolate instead of semi-sweet chips.
Nutrition
- Serving Size: 1 slice
- Calories: 550
- Sugar: 45g
- Sodium: 350mg
- Fat: 35g
- Saturated Fat: 20g
- Unsaturated Fat: 15g
- Trans Fat: 0.5g
- Carbohydrates: 55g
- Fiber: 2g
- Protein: 8g
- Cholesterol: 110mg