
There’s nothing quite like pulling a loaf of deeply golden, wonderfully tangy homemade bread from your own oven. I remember being so intimidated when I first looked at recipes for that magic ingredient—the sourdough starter. It felt like I needed a science degree just to get those wild yeasts going! But trust me, after years working in test kitchens and studying food science, I figured out the simplest, most reliable way to get you up and running. My background helps me strip away all the confusing jargon. This isn’t some delicate mystery; this guide is foolproof, designed especially for the beginner cook who just wants an active, bubbly starter without the stress.
- Why You Need to Create Active Sourdough Starter From Scratch
- Essential Ingredients for Your Sourdough Starter
- The Sourdough Starter Day by Day Guide: How to Make Sourdough Starter
- Feeding Sourdough Starter Guide: Maintenance and Ratios Explained
- Sourdough Starter Tips and Tricks for Success
- Troubleshooting Common Sourdough Starter Issues
- Frequently Asked Questions About Your New Sourdough Starter
- Estimated Nutritional Data for Your Sourdough Starter
- Start Baking with Your Sourdough Starter Today
Why You Need to Create Active Sourdough Starter From Scratch
I get it; buying commercial yeast is fast. But honestly, making your own natural yeast starter is way more rewarding, and once you see it bubbling, you’ll be hooked! My promise to you, especially if you’re new to this, is that we make this process easy.
Benefits of Your Own Sourdough Starter for Beginners
- You control every ingredient that goes into your bread.
- There’s something so satisfying about coaxing life from just flour and water!
- It opens the door to amazing recipes like my famous homemade dinner rolls.
- This process is the foundation for all great sourdough starter for beginners projects.
Essential Ingredients for Your Sourdough Starter
This might be the best part: you only need three things to begin! When I test recipes in my kitchen, I always insist on quality, even when it’s something this simple. We aren’t messing around with fancy additives here; this is strictly flour and water, just like the best homemade bread starter recipes from decades ago.
Clarifying Flour and Water for Your Flour and Water Starter
For the very beginning, I want you to use whole wheat or rye flour. These grains carry more wild microbes, meaning they wake up faster than plain All-Purpose flour. That initial boost is key to getting those first bubbles to show. Next, the water is crucial—it absolutely must be unchlorinated. Chlorine actually kills the helpful yeast and bacteria we are trying to grow, so please reach for filtered or bottled water to start this natural yeast starter.

- 100g Whole Wheat or Rye Flour (for initial activation)
- 100g All-Purpose Flour (for ongoing feeding)
- 100g Unchlorinated Water (room temperature)
The Sourdough Starter Day by Day Guide: How to Make Sourdough Starter
Okay, this is where the real fun begins! I know seeing instructions spread over seven days seems like a lot, but trust me, most days it’s just five minutes of mixing and walking away. This is the process that turns simple flour and water into your reliable little pet, your essential sourdough starter. If you want to learn how to make sourdough starter, consistency is your new best friend.
Days 1 and 2: Beginning Your Sourdough Starter From Scratch
For Day 1, grab your clean jar and mix 50 grams of that hearty whole grain flour with 50 grams of room-temperature water. Stir it until it looks like thick pancake batter—no dry pockets allowed! Cover it loosely, okay? It needs to breathe. Then, on Day 2, you do absolutely nothing. Seriously! No touching! Let that mixture just sit at room temperature for 24 hours. Don’t panic if you see zero activity; it’s just getting comfy.
Days 3 and 4: Introducing Consistent Feeding for Your Sourdough Starter
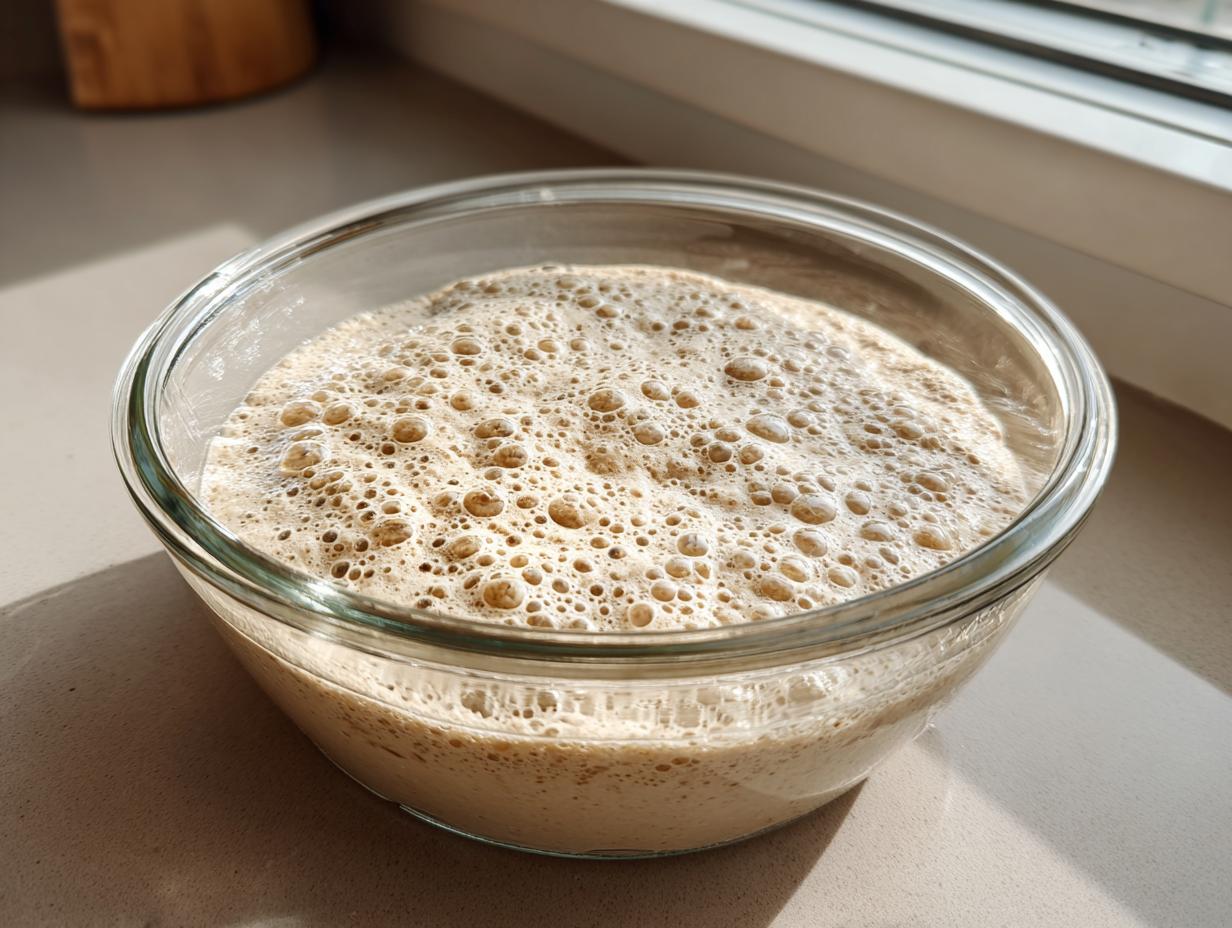
Now we start the feeding game. On Day 3, you need to scoop out and throw away half of what’s in there—this is called discarding, and it keeps your yeast population healthy and fed. Then, feed the remaining starter with 50g of all-purpose flour and 50g of water. By Day 4, you should see small signs of life, maybe a tiny bubble or two! Keep repeating that discard-then-feed process every 24 hours.
Days 5 and 6: Pushing to Create Active Sourdough Starter
If your kitchen is warm, say above 72°F, you might need to start feeding twice a day now—every 12 hours. If it’s cooler, stick to once daily. The key here is the feeding ratio: always discard down to about 50g starter, then add 50g flour and 50g water. You should start noticing it doubling in volume within half a day. This intense feeding push is how we really create active sourdough starter.

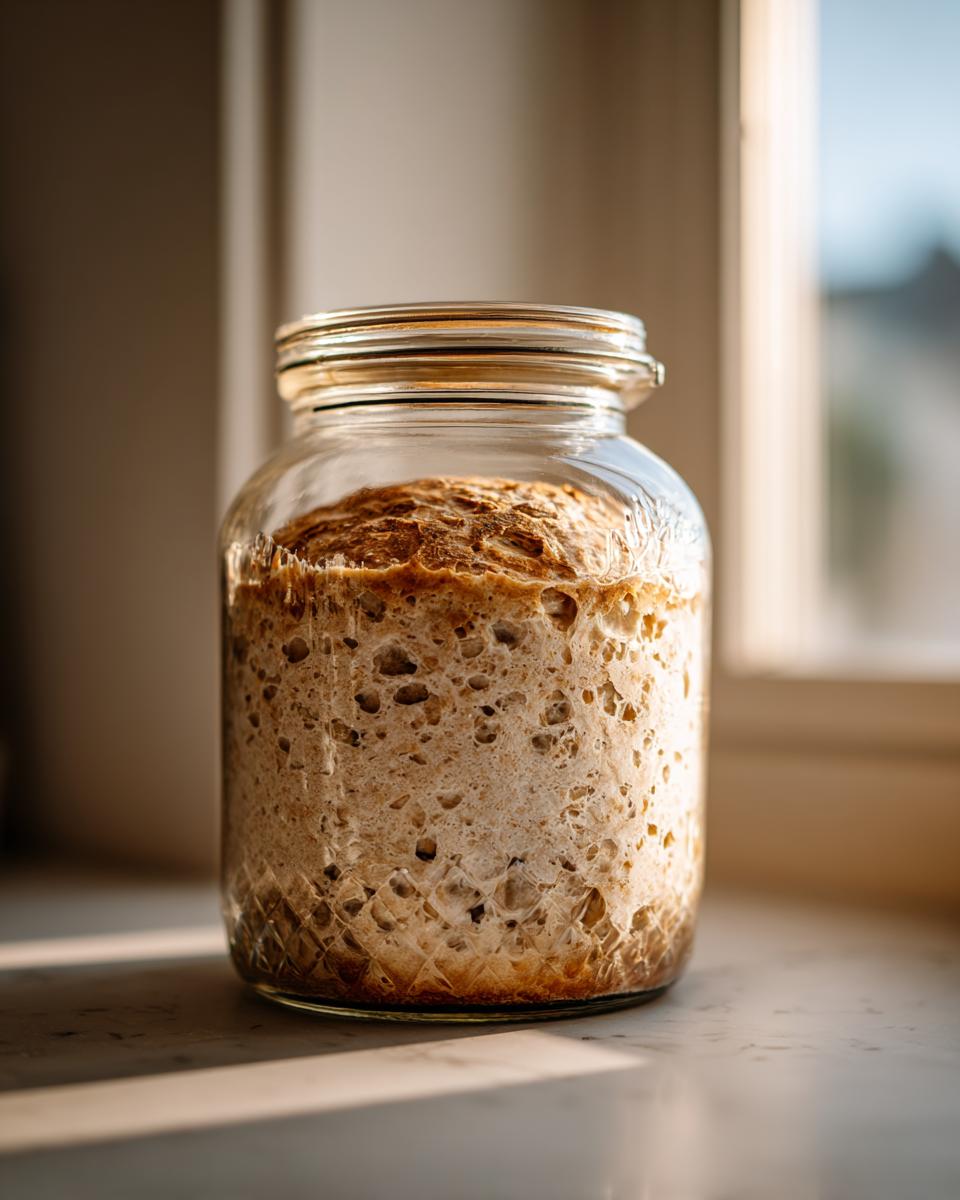
Day 7 Onward: Confirming Your Mature Sourdough Starter
By Day 7, you should have a happy, predictable starter! It’s ready when it reliably doubles its size within 4 to 8 hours after you feed it. When it looks like a bubbly sponge, you’re golden. If you’re not baking daily, move it to the fridge and learn more about proper storage over at Wild Thistle Kitchen. You’ve done it—you have your own incredible sourdough starter from scratch!
Feeding Sourdough Starter Guide: Maintenance and Ratios Explained
Congrats! Now that you have this vibrant, living thing in your kitchen, you need to know how to keep it happy long-term. You don’t want to be feeding it huge amounts every day if you’re only baking on weekends, right? It all comes down to understanding the feeding sourdough starter guide and the magic of ratios. Most people get confused here, but it’s really simple once you use weight.
For regular feeding, we stick to a beautiful 1:1:1 ratio by weight. That means for every 1 part of old starter you keep, you add 1 part flour and 1 part water. If I keep 50 grams of starter, I feed it 50 grams of flour (usually all-purpose now) and 50 grams of water. Simple! If you want to check out some deeper dives into altering those numbers, check out the discussion on sourdough starter ratios explained over at Pantry Mama. Keeping this routine means you’re making sourdough starter for beginners into a sustainable hobby!
Maintaining a Bubbly Starter: Room Temperature vs. Refrigeration
This choice totally depends on how often you bake. If you’re baking almost every day, keep your jar sitting on the counter. But you need to feed it daily, no exceptions, using that 1:1:1 ratio we just talked about. If you’re like me and only bake on the weekends, the fridge is your best friend. Feed it well, let it sit out for maybe an hour or two to start waking up, and then pop it into the cold dark. When you’re ready to bake, pull it out the day before and give it one or two good room-temperature feedings to wake up that incredible natural yeast starter!
When it’s time to bake from the fridge, make sure you take out enough starter to feed for its final proof. I always use the excess starter to whip up some quick homemade English muffins so nothing goes to waste!
Sourdough Starter Tips and Tricks for Success
Okay, friend, you’ve got your starter bubbling, but what about those little things that trip people up? As someone who has fed starters through hot summers and cold winters, I can tell you that a few sourdough starter tips and tricks make all the difference for your homemade yeast starter. Don’t stress if it seems slow sometimes; that’s part of the adventure!
If you are seeing low activity, try upping the temperature slightly, or switch back to whole grain flour for just two feedings. That rye/whole wheat boost is like giving your little yeast colony a rich meal. Also, make sure that jar is perfectly clean every time you feed it. A clean home keeps your sourdough starter happy and healthy.
What to Do With Excess Sourdough Discard Recipes
That daily discard can really add up, and I hate waste! Don’t just toss it; save it in a separate jar in the fridge for a baking day treat. You can use that discard to make the most incredible, tender buttermilk biscuits. Once you are comfortable managing your main starter, you’ll find dozens of things to make, so nothing goes unused!
Troubleshooting Common Sourdough Starter Issues
Even reliable science throws curveballs sometimes! When you are learning to maintain a bubbly starter, you are going to run into a few things that look scary, but almost never are. Don’t sweat it; my test kitchen experience taught me exactly what these weird sights mean—and how to easily fix them.
The biggest thing that scares new bakers is the liquid that sometimes pools on top. That greyish or brownish liquid is called “hooch.” It’s totally normal! It just means your starter is hungry and needs to be fed sooner. When you see hooch, just pour it off (or stir it in if you don’t mind a tangier flavor) and give it a nice, fresh feeding. It’s the starter’s way of asking for breakfast!
What if nothing is happening? You see no bubbles, and it hasn’t grown at all after a few days. This is usually down to temperature or chlorine in the water from Day 1. If your kitchen is chilly, try moving your jar to a warmer spot, maybe on top of the fridge or near a pilot light if you have one. A sluggish starter just needs a little warmth and perhaps a switch back to rye flour for a feeding or two to wake things up. Use a warm spot to encourage growth!
Now, for the one thing you actually *do* need to worry about: mold. If you see fuzzy spots—pink, green, or black—you have to toss the whole batch, jar and all, and start over. Mold means bacteria has taken over, and that’s a risk we just don’t take with our homemade bread starter. Clean everything perfectly before beginning again, and remember to keep your jar uncovered just enough for airflow!
Frequently Asked Questions About Your New Sourdough Starter
I always get tons of questions once folks see those first bubbles! It shows you’re worried about this little guy, and that’s great because taking care of your sourdough starter is what gets you that incredible homemade bread starter flavor.
Can I use regular tap water for my sourdough starter for beginners?
Oh, please don’t! I know it’s the easiest water to grab, but I mentioned it before for a reason. Tap water usually has chlorine in it, and that stuff is designed to kill living organisms—which is exactly what we are trying to grow! If you want your starter to be a happy, robust, easy sourdough yeast source, you have to use filtered or bottled water, at least until it’s mature and established. It’s worth the extra step, trust me!
How long does it take to create active sourdough starter?
This is the biggest source of impatience, I swear! People want a magical rise on Day 3. Honestly, to truly create active sourdough starter that you can depend on for beautiful bread, you need to plan for 7 to 14 full days. If your kitchen is cool, it might take closer to two full weeks. If you’ve got it sitting in a warm spot, you could be ready by Day 7 or 8. Just keep feeding consistently according to that feeding sourdough starter guide, and it will happen!
If you’ve successfully finished this starter process, you might want to try a simple dip recipe while your bread is baking! My easy creamy garlic aioli uses just a few pantry staples and is faster than letting your dough bulk ferment!
Remember, if you run into any weird situations during the waiting period, hop over to Little Walnut Cottage for another great perspective on those first few days.
Estimated Nutritional Data for Your Sourdough Starter
I have to be super clear about this part: since this starter is basically just flour and water that is fermenting—it’s alive!—the true nutritional makeup changes every single hour. These numbers below are just an **estimate** based on the flour and water content from a standard feeding ratio before the yeast/bacteria have really started munching through everything. Don’t treat this like a nutrition label for a finished bread loaf; it’s just a guide for the raw ingredients we’re using on any given day!
If you were to use 100 grams of the starter mixture right after feeding, here’s what you can generally expect:
- Serving Size: 100g (unbaked)
- Calories: 180
- Sugar: 0.5g
- Sodium: 1mg
- Fat: 0.5g
- Saturated Fat: 0.1g
- Unsaturated Fat: 0.4g
- Trans Fat: 0g
- Carbohydrates: 37g
- Fiber: 2g
- Protein: 5g
- Cholesterol: 0mg
See? Mostly just good, energy-giving carbs from the flour. That’s why switching to whole grains in the beginning is so helpful—it gives those wild cultures more to work with early on. It’s amazing how much life we can get going with just these humble components!
Start Baking with Your Sourdough Starter Today
Wow! You did it. You successfully grew your own sourdough starter, and now it’s ready for action! Forget waiting around; it’s time to taste the fruits of your labor and bake that first loaf. Don’t let that active starter sit around getting too hungry!
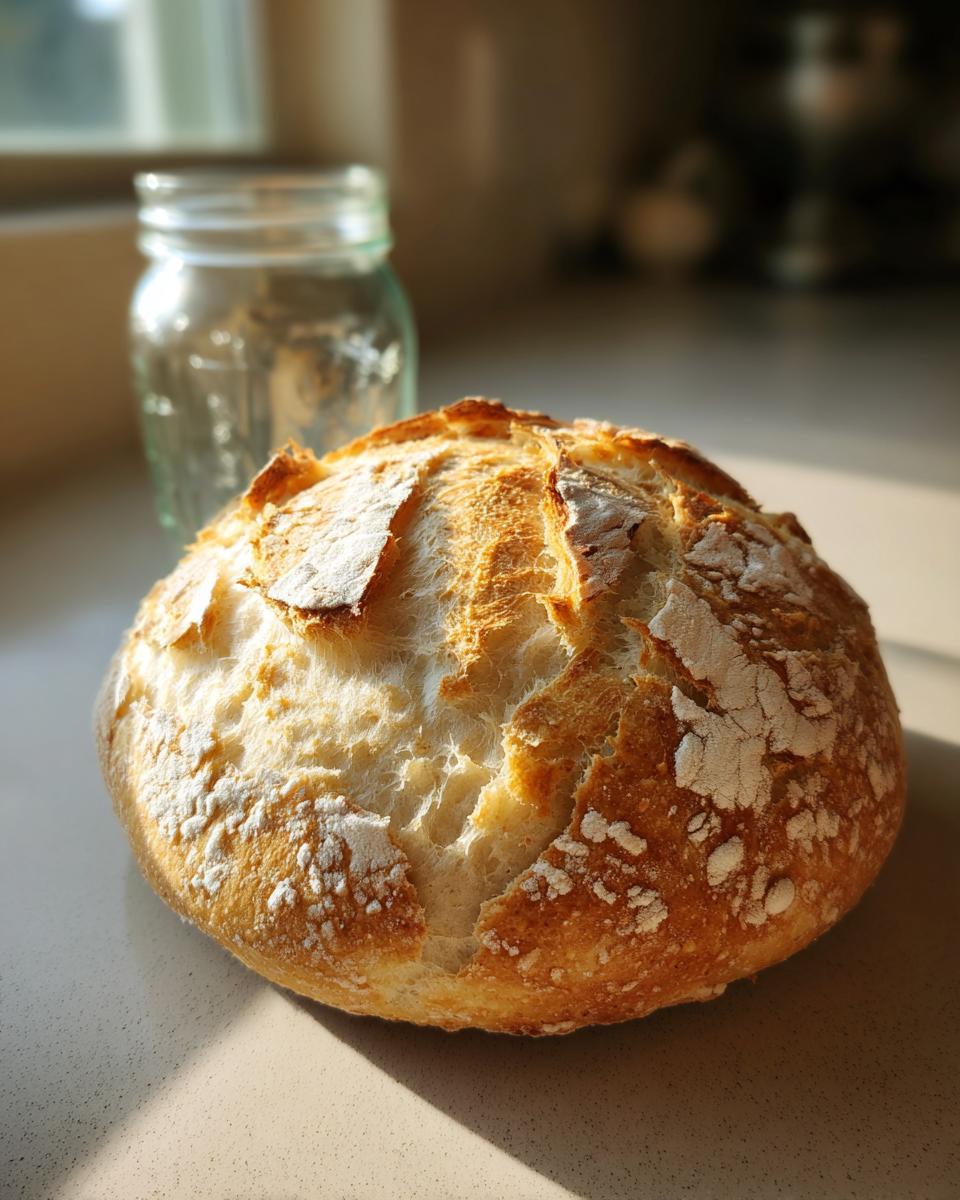
The flavor you get now is completely unique, and I can’t wait for you to try it. Remember, once you master the starter, every bread recipe becomes ten times better. If you’re looking for something super quick while your first loaf sets, grab the recipe for my homemade mayonnaise recipe—you’ll have a perfect accompaniment ready in minutes!
Remember, if you run into any weird situations during the waiting period, hop over to Little Walnut Cottage for another great perspective on those first few days.
PrintThe Ultimate Guide: How to Make and Maintain a Sourdough Starter From Scratch (Day-by-Day Instructions)
Learn how to create an active, bubbly sourdough starter from just flour and water. This guide offers simple, day-by-day instructions perfect for beginners to establish their own natural yeast starter for homemade bread.
- Prep Time: 5 min per day
- Cook Time: 0 min
- Total Time: 7 days (active creation period)
- Yield: Approx. 100g active starter
- Category: Baking Essential
- Method: Fermentation
- Cuisine: American
- Diet: Vegetarian
Ingredients
- 100g Whole Wheat or Rye Flour (for initial activation)
- 100g All-Purpose Flour (for ongoing feeding)
- 100g Unchlorinated Water (room temperature)
Instructions
- Day 1: Initial Mix. In a clean jar, mix 50g of whole wheat or rye flour with 50g of room temperature water. Stir until no dry flour remains. Cover loosely (do not seal tightly) and let it sit at room temperature (ideally 70-75°F or 21-24°C) for 24 hours.
- Day 2: Rest. You may see little or no activity. Do nothing today. Let the mixture rest at room temperature for another 24 hours.
- Day 3: First Feeding. Discard half of the starter mixture (about 50g). To the remaining starter, add 50g of all-purpose flour and 50g of water. Mix well, cover loosely, and let it sit for 24 hours. You might see some small bubbles.
- Day 4: Second Feeding. Discard half of the starter. Feed the remainder with 50g of all-purpose flour and 50g of water. Mix well. You should notice more activity, perhaps doubling in size within 12 hours.
- Day 5 & 6: Consistent Feeding. Continue the feeding schedule twice a day (every 12 hours) if your kitchen is warm, or once a day if it is cooler. Always discard half before feeding 50g flour and 50g water. Look for consistent doubling in size and a pleasant, slightly sour aroma.
- Day 7 Onward: Maturity. Your sourdough starter is ready to bake with when it reliably doubles in volume within 4 to 8 hours after feeding and shows many bubbles throughout. Once active, you can switch to maintaining it with a 1:1:1 ratio (starter:flour:water) when feeding.
- Maintenance (If Baking Often): Keep the starter at room temperature and feed it daily using a 1:1:1 ratio.
- Maintenance (If Baking Infrequently): Store the fed starter in the refrigerator. Feed it once a week by taking it out, letting it warm up, discarding most of it, feeding it, letting it sit for 2-3 hours, and then returning it to the fridge.
Notes
- Use unchlorinated water, as chlorine can inhibit yeast growth. Filtered or bottled water works well.
- If your starter seems sluggish, try using whole grain flour for a few feedings to boost the wild yeast activity.
- A 1:1:1 feeding ratio (by weight) is standard for maintenance: 50g starter, 50g flour, 50g water.
- If you have excess starter after feeding, use it in sourdough discard recipes like pancakes or crackers.
Nutrition
- Serving Size: 100g (unbaked)
- Calories: 180
- Sugar: 0.5
- Sodium: 1
- Fat: 0.5
- Saturated Fat: 0.1
- Unsaturated Fat: 0.4
- Trans Fat: 0
- Carbohydrates: 37
- Fiber: 2
- Protein: 5
- Cholesterol: 0